Showing posts sorted by relevance for query Elementary. Sort by date Show all posts

Thursday, July 2, 2020

Elementary Art Enrichment Ideas

When we started our Continuous Learning Plan, Kansas' response to Covid-19, it was decided that elementary specials would be offered as enrichment. Music and PE had two different Zoom sessions a week for PK-2 and 3-6 but I got permission to just do one for all elementary and to use Facebook live. I think it worked better for me with demonstrating (not that I was flawless) than Zoom would have. Why did I ask for one session? Well, besides that I had scheduled Zoom sessions with my middle and high school classes on the same day, I knew that I could present the same ideas and tell how younger and older kids could participate. I also know that with my own children, if the older kid is doing an activity, the younger kids want to do the same thing. All in all, it worked out pretty well.

Here are the themes I used for each week:
Week 1: Color
In the first week I talked about primary and secondary colors and how to mix them then we made a found object color wheel for the #colorwheelchallenge!
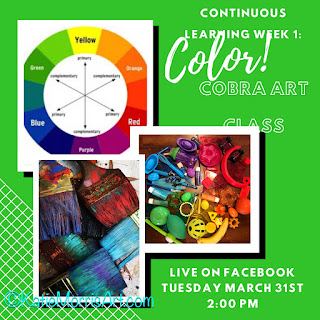
Does anyone else have trouble when downloading images from the Canva app? Sometimes I have to do a screenshot to avoid distortions like in the graphic above.

Week 2: The Creatrilogy
Peter H. Reynolds gave permission for teachers to read his books to our classes and since I'm a big fan, I read The Dot, Ish, and Sky Color from the Creatrilogy box set. Suggested activities were...
The Dot: Make dot artwork!
Ish: Draw ishly- use a marker so you can't erase and embrace mistakes!
Sky Color: Observe the sky and paint what you see. Maybe even observe the sky at different times of day or different days of the week. Watercolor demo.

Week 3: Zoos and Aquariums
Have you seen all the zoos and aquariums that were offering virtual field trips and animal talks during social distancing? I showed 4 project ideas inspired by specific zoos or aquariums- a porcupine from the Elmwood Park Zoo, a jellyfish from the Monterrey Bay Aquarium, Fiona the Hippo from the Cincinnati Zoo, and a giant panda from the Smithsonian National Zoo. Check it out!


Week 4: Earth Week
Goldsworthy-inspired nature artwork, Patrick Dougherty-inspired stick art, nature faces, nature fairies, and stick weaving. I love nature art!
Here is the doc with the activities I suggested. Feel free to make a copy so you can edit!

Week 5: Fauvism
I thought of Matisse's Open Window as soon as I knew we would be working from home. I wanted to talk to students about looking around them and how we all see different things out their windows. I said they could draw from observation what they see out their window or even what they would like to see! I went ahead and threw in some more art history and talked about setting up a colorful still life to observe.
Here is the doc I shared!


Week 6: Art Outside
This was my worst week! I paid attention to the temperature in the forecast but not the wind speed. And I live in Kansas! I tried to show using toys to draw shadows and doing texture rubbings but it was so windy that after 5 or 10 minutes I told the students watching it was a good thing they already knew I wasn't perfect and gave up.

Week 7: 2D and 3D
I couldn't really decide what to do for the last week so I asked on my facebook page what the students wanted. A first grader told her mom it would be "life changing" (LOL) if I would show how to draw 3D shapes since they were doing that in 1st grade math. We talked about the differences between 2D shapes and 3D forms (in art we have more specific vocabulary) and then I showed how to draw cubes, cylinders, and cones. I ended by showing how to do 1 point perspective letters since that is usually a hit with upper elementary students.


Wednesday, July 4, 2012

3rd Grade Clay- The Pot That Juan Built


I've taught the same clay lesson for 3rd grade each year- the students hand-build pots with a slab base and coil sides based on the book The Pot That Juan Built. I demonstrate then read the book to the students while they work. (It's my quietest 3rd grade class of the year!) In the second class period when the pots are dry, the students use tempera cakes to paint. The last 2 years, I have just let the students have at it with no direction on colors. This year, we used Aesthetic Scanning to discuss some photos of Juan Quezada's pottery (seen here and here). The students noticed how he typically only uses 2 or 3 colors in the pottery and has lots of little details added with lines. So this year, the students could choose 2 colors of tempera cakes, then I put out liquid black tempera and little tiny brushes so they could add designs on top of their colored base. I like the pottery both ways but overall, they look more finished this way. (You can see a few photos from last year's project here.)
When we make attachments in clay, we use the "4S" method: score, slip, squish, and smooth. I also like this because my older kids use "4S" lines: straight, silent, still, smiling.


We use air dry clay because we don't have access to a kiln. You can read my tips for teaching elementary Art without a kiln here: http://artteacheradventures.blogspot.com/2012/01/tips-for-teaching-elementary-ceramics.htmlhttp://artteacheradventures.blogspot.com/2012/01/tips-for-teaching-elementary-ceramics.html and add your own tip in the comments!

Sunday, January 10, 2016

Starting with Standards- 3rd Grade Special Place

I spent a lot of time over the summer going through and writing "I Can" statements for each of the new National Arts Standards so that I would be organized for the school year. I wasn't sure how often I would see the elementary classes since my schedule has one elementary slot a day but I knew at most it would be every other week. Right before school started I found out that my new district was going to try having some of the elementary art classes in quarters. This school year, I will see PreK and Kindergarten about 18 times, 1st and 2nd grade about 12 times, 5th and 6th grade about 9 times, and 3rd and 4th grade either 9 or 12 times. When you see the number of classes, it really makes you focus on what is most important to cover!

For 3rd grade, I decided to start with standard VA:Cr2.3.3- "Individually or collaboratively construct representations, diagrams, or maps of places that are part of everyday life", which my former art PLC and I had turned into "I can represent places from my life in artwork on my own or collaboratively."

The question I asked them on the first day of art class is "Where do artists get ideas?" We brainstormed a lot of ideas and I made sure they realized that ideas can come from the world around us. I told the students that I wanted them to focus on special places in their lives for the first project. I gave each student a planning sheet to help them think of ideas. Condensed version:


Name:_______________________


Special Place Planning Sheet


Brainstorm some places in your life that are special to you and list them below:


Circle one place that stands out the most.


What is special about the place?


What does it look like? Describe it using adjectives and specific details.

After students had planned their ideas, they were given paper and the option of using any drawing media or collage to complete their work. As students worked, I went around the room giving feedback and helping to solve problems. I just tried to help them figure out how to best carry out their ideas.


Some students made artwork about a place they went on vacation or for a special day with their family.
Some students made artwork about a place they compete like the softball field and rodeo below.
Some students realized that places might be special because of the people we spend time with there, like the student who represented baking cookies with her mom.
When the projects were finished, students were asked to write an artist statement about their work, which was kept pretty simple for their first artist statement- what's going on in your picture and why did you choose this place?

We packed a lot of standards in to this lesson but the students still had choices. With such a small number of class periods for some grades, starting with the standards really helped me focus. I'm always trying to find the right balance of hitting standards and empowering students to work like artists.

"I Can" statements for this lesson:
VA:Cr2.3.3
I can represent places from my life in artwork on my own or collaboratively.
VA:Cr2.2.3
I can use tools and materials safely for a variety of artistic processes.
VA:Cr3.1.3
I can add details to my artwork to enhance the meaning.
VA:Cr2.1.3
I can create artwork that I am proud of using different processes and materials.
VA:Pr5.1.3
I can prepare an artist statement.


Friday, February 4, 2011

Attention Kansas Teachers!

Kansas Youth ART Month Celebration
Sponsored by Sargent Art

Every art teacher in the state of KS is invited to enter one piece of art work from each of the schools that they teach at into the YAM show. If you teach at several different schools every school can be represented. If you teach at a K-12 school you may enter work at every level: 1 elementary, 1 middle school, & 1 high school.

• The exhibit is at the state capital on Feb. 26, 2011.

• The reception for students, teachers, administrators, parents, and guests is Feb. 26 from 2pm to 4pm.

• Sargent Art Winners will be awarded prizes at 1:30 pm on Feb. 26, 2011.

• The Sargent Art YAM contest is open to all students of teachers that are current members of KAEA.

• If you are not a KAEA member you may still send work, it is just not eligible to win the Sargent Art prizes.

• It’s never too late to become a KAEA member. Join us @ http://www.arteducators.org/community/membership

• Sargent Art will award prizes of art supplies to the winning artists and teachers in each category: Elementary, Middle, and High School.

• ONE Grand Prize Winner will receive an all-expense paid trip to NYC for the artist, teacher and one parent!

• Art work can be sent with a YAM Area Representative in your area. A list and contact information can be found at http://www.kaea.com/yam.html

• For additional details, entry forms, and delivery deadlines, see the KAEA web site YAM page.

• For additional information you can contact Shawny Montgomery, KS YAM chair @ smontgomery@cheney268.com

Wednesday, February 15, 2017

Digital Found Object Faces


Here's a fun lesson I did with my Computer Graphics class at the beginning of the semester. In first semester we focused on a lot of different tools in Photoshop but for this first project of the new semester I wanted students to practice different ways of obtaining images. This time they were not allowed to use any images they found online, but instead could use the scanner and digital camera.

The full lesson plan can be read here as a Google Doc and the Slides presentation I showed to kick it off can be viewed here. You can also "keep" the lesson and resources on the smARTteacher.

We looked at illustrations made by Hanoch Piven, one of my favorite illustrators, and watched a chunk of his TEDx Jerusalem talk. We discussed composition and how the objects he chooses to make the facial features of his subjects often relate to their personality or life. Here are the requirements and suggestions given to the class:

  • Create a self portrait using found objects for facial features. Consider using objects that represent you.
  • Pay close attention to the composition- how things are arranged. Not only should the objects be composed into a face, the whole portrait should fill the space of the page so that it is interesting and eye-catching. Will you use just head and shoulders or a big head on a little body?
  • Use a combination of techniques to digitize your objects- digital camera and/or scanner
  • You may paint the background of the head and digitally place the objects on top
  • Image size should be a minimum of 8x10 inches, 300 ppi

The students seemed to really enjoy this lesson so it will be brought back again next year. I had used Piven for inspiration at the elementary level but this was my first time introducing him to high schoolers. Click here for a mixed media Piven-inspired elementary lesson and here for a fun activity tub, the Piven box.

Tuesday, September 8, 2020

Back to School 2020

Well, my school has been back in session for a few weeks now and it's going ok! For posterity, I'll explain a bit about what we're facing right now.

Last March we went on spring break and didn't return to the building. Covid-19 had hit the US and we didn't know a whole lot about it. We finished the year doing school from home. 

My district is small enough that we are able to open at full capacity. We do have a virtual school option that several families opted for, but most are in the building.
My StuCo kids have a tradition of chalking the walk so that students are greeted with encouraging messages on the first day of school. This year we also added some yard signs and got out "Francis" to make things more fun.

The first change for this school year is that face masks are required for students over 5 and for staff. I am glad that we have this requirement. It makes me feel a bit better about being around so many people. It shows that we care enough about others to try to keep them safe. My room is at the end of the hallway so if we finish clean up early, it's easy to step outside for a quick mask break before the kids go on to their next class.
Sanitation procedures have been amped up this year. I put together personal art supply kits for students to use in the classroom and for me to send home with them if we go remote. I ordered 2 gallon Ziploc bags because they are big enough to easily hold 9x12 inch paper inside along with all of the tools we need. I didn't want to pass out the supply kits until students were done switching classes but since most of my sections are graphic design or computer graphics we just started with some quick digital projects.

I have a classroom that makes it kind of impossible to have all students facing the same direction. The district ordered sneeze guards to divide the space on my tables. In some classes students can have a whole table to themselves since my enrollment is lower this year between virtual families being off campus and a drop to a smaller enrollment with graduating a larger class last year. I do have one class of 18 in a room that seats 24 in a normal year so that feels pretty crowded. We have 4 students at 4 tables and 2 students and a Para at another, which is also the table I use when I need to hook up to the tv for a demo. I'm a little nervous about having 23 kids in that classroom 2nd semester but I guess things could change before then!
Another change is that I am "zooming" in to the elementary classrooms for their art classes. A recently retired teacher came back as a Para and she supervises the class while I teach from my classroom. They were trying to cut down on people crossing between the two buildings so I think it was a smart move. This morning I was the "art fairy" and dropped off paper for the week's classes. The students mainly use the supplies they brought to school so I'm just planning based off of that. Teaching in this way is not that conducive to TAB but I'm hoping I can figure out how to make it work.
This is a photo of the end of an elementary class when the students came up one at a time to share their work. We actually have more instructional time since clean up is faster and we don't have to walk back to the other building so sharing at the end of class is a bonus.
This is my set up when I need to demonstrate something. I have an iPad with the camera pointing down in an opening of an old shelf and hook the iPad up to my laptop. Books hold the shelf up high enough to give me room to move beneath it. When I'm ready to demonstrate, I just share my screen and select the device. It's kind of bulky, but it works. I also use the iPad set up like this but hooked to my smart TV for demonstrations since I can't just call the class around a table anymore.

Here are a couple examples from my advanced class's first assignment. We watched a video from the Art Assignment on the Definition of Art and students wrote their own before creating a graphic in Canva.

Wednesday, October 15, 2014

KAEA Awards

Last weekend I attended my state's annual art education conference. I enjoyed catching up with friends I only get to see once a year and attended some great workshops! At the conference awards banquet, I was honored to accept the 2014-2015 KAEA Outstanding Elementary Art Educator of the Year award.
I'm bring awkward back...
My nominator wasn't able to attend so one of the KAEA Co-Presidents presented the award. You know how kids sometimes accidentally say "Amen" after the Pledge of Allegiance? Well, I almost said it after my thank you speech...
 Here is a group photo of all but one of the award winners. We didn't catch the Art Enhancer in time and he had already left. Pictured from left to right are:
Karen Gerety Folk, Outstanding Museum Educator of the Year
Bob Cross, Outstanding Retired Art Educator of the Year
Cindy Balthazor, Outstanding Middle Level Art Educator of the Year
Me (Katie Morris), Outstanding Elementary Art Educator of the Year
Jennifer Hudson, Outstanding Secondary Art Educator of the Year
Tina Murano, Outstanding Overall Art Educator of the Year