Showing posts with label Multicultural Art. Show all posts

Sunday, January 4, 2015

2nd Grade Indian Elephants

My second grade project for our Cultural Heritage study on India this year involved learning about the significance of elephants in Indian culture and the beautiful block printing method used for textiles. The students created stamps out of cardboard and foam and used that the create a patterned background. Then, the students drew elephants and glued them in the center of the printed background. I typed the lesson up to share on the smARTteacher in November. You can see the complete lesson HERE. 

1. Introduction
-Briefly talk about India, show location on map
-Explain that art is infused into Indian culture
-Block printed textiles from India are very beautiful and detailed. Explain and look at pictures of fabric and printing process.
2. Show how to make a stamp with cardboard and foam (instead of carving wood like most of the blocks from India.) Remind students that they have to cut shapes instead of lines. "Lines" can be made by cutting very thin shapes.
3. Students cut foam shapes, check with teacher, and then glue to cardboard when approved.
4. Print stamps
-Students choose construction paper
-Use paintbrush to apply black tempera to stamps (this helps my students not get too much)
-Start in a corner and stamp along edges first.
-Talk about how rotating or flipping the stamp can create a different kind of pattern.
-Filling in middle is optional. Just printing a "frame" also looks nice.
5. Introduce Indian elephants
-Look at pictures of Indian elephants and artwork including elephants
-Elephants were the traditional mode of transportation for Indian royalty
6. Make elephants
-Students draw Indian elephants on 6x9 inch white paper
-Trace pencil drawings with sharpie
-Color elephants with crayons or colored pencils
7. Cut out elephants
-Remind students to turn the paper, not their scissor hand, and to be careful with dangly parts like the tail and trunk
8. Glue elephants in center of printed papers
- See more at: http://www.thesmartteacher.com/exchange/resource/1405/Indian-Elephants#sthash.pgcPE7Zu.dpuf

I love how the printed papers turned out. Some students flipped or rotated to create more complex patterns. Lots of good math connections.
A lot of "India" projects I've seen use elephant tracers... while my students' elephants may not look like you'd expect, it was more important to me for them to practice looking and drawing than to have a perfect elephant. Besides, look at all the personality!

Wednesday, December 24, 2014

Warli Tribal Art

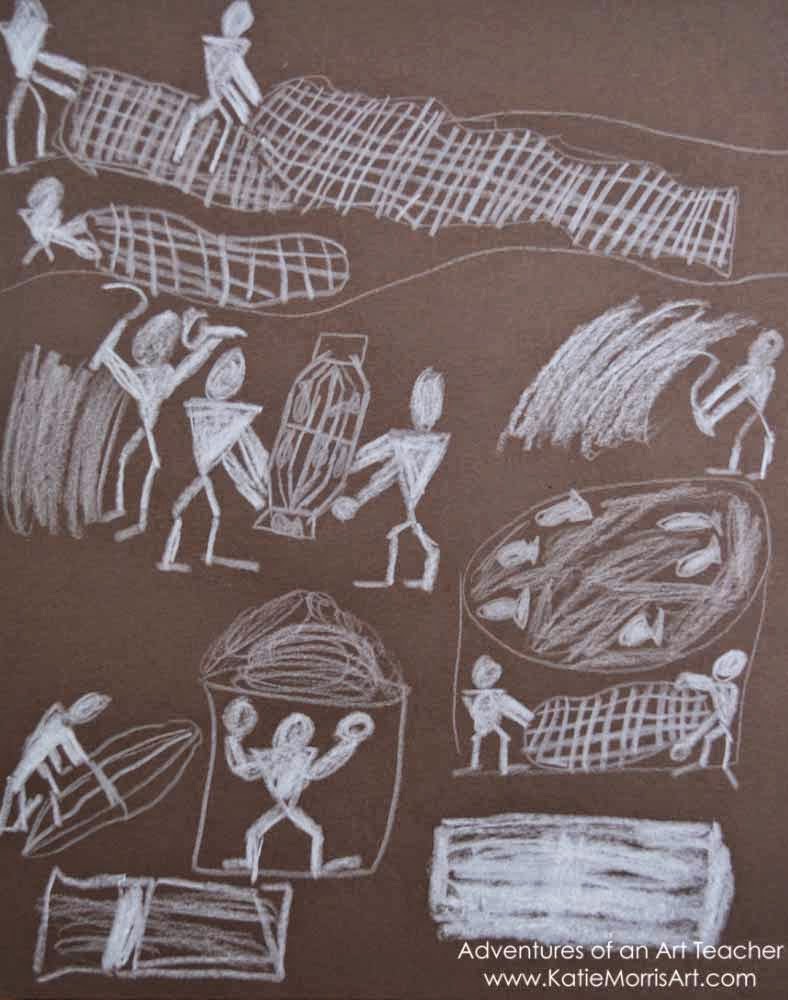
When I was researching Indian Art and Craft for our Cultural Heritage focus this year, I came across a blurb about art from the Warli tribe. Their artwork has a lot of pattern and repetition of simple shapes. The figures of people are made from geometric shapes and they are usually working on day to day tasks. While most intermediate students gravitated toward the starting points of animals or mehndi, a few students were excited about drawing people without the intimidating details.
The students used the style of Warli tribal art and depicted something that was of interest to them. The artwork above is a drawing of a space station made with white colored pencil on brown construction paper. Some students drew scenes of their lives, like recess, and interests, like Minecraft. 
You can see some pictures of Warli tribal murals here!

Monday, November 24, 2014

Kindergarten Holi Portraits

This year our Cultural Heritage Focus was India. My K-3rd grade students each had a more structured lesson while the 4th-6th grade students chose their starting point. Kindergarten students learned about the Holi festivals in India.
First, we watched this news video:

Next, we looked at photos from National Geographic. They're beautiful, check it out!

I asked the students to think about what it would be like at the Holi festival and imagine they were in attendance. The students drew a self portrait and some added a friend or family member with them. The students traced the drawings with sharpie and then we added color, which was the most fun part. As soon as I saw pictures of the colored powder being thrown at the Holi festival, it made me think of powdered tempera.
Students placed their drawings in boxes, used dry paintbrushes dipped in powdered tempera to sprinkle color on top, then we sprayed with water to activate the paint. When the projects dried, I "fixed" them with hairspray.
Powdered tempera is super cheap and pretty brightly colored.
My first class used crayons because I was thinking it would create a resist. I always forget that Kinders have a hard time pressing hard enough with crayons, especially at the beginning of the school year, to create a good resist. We switched to just sharpie line drawings in the next class.
Students did need supervision while applying the powder. Some wanted to just dump a whole bunch in one spot so I had to give reminders about sprinkling and spreading it out. 
Watercolor paper would have been preferable to the drawing paper which wanted to curl as it dried, but I was able to flatten the artwork pretty well.
We have a bunch of powdered tempera left. While I don't like painting with it as intended, I think there are some good possibilities for the sprinkle and spray method!

Tuesday, December 3, 2013

CYOA: Slab Figures

This summer when I was researching possible starting points for our Native American cultures study, I came across a blog post on lindsay lou's happenings that had information about a new-to-me artist named Dawning Pollen Shorty. Pollen Shorty is a Native American artist who makes awesome earthy figures out of the micaceous clay found near Taos Pueblo which she fires the traditional way. I don't want to post pictures of her work without permission so please, look her up, and check out this article about her family!
Only a few students decided to take a risk and try this "adventure" during our Choose Your Own Adventure (CYOA) Native American inspired clay lesson. It was a little challenging but the few who tried it did a pretty decent job. They started by separating a bit of clay that would later be used to form a head. The rest of the clay was formed into a slab and curved so that it would stand and support itself. Attaching the head was the trickiest part. Later, when the clay was dry, the students painted with tempera cakes. We don't have a kiln or access to one, so this year we tried coating the painted projects in a multimedia varnish. I am really pleased with the result! It added a nice sheen and strengthened the pieces.

Below is my choice board for our clay projects. You can read about the other CYOA projects here: 

CYOA: Embellishing Pottery


Friday, November 29, 2013

CYOA: Effigy Pots

Each year the art teachers in my school district choose a different part of the world or culture as a K-12 focus. We try to get other departments involved as well for interdisciplinary connections. The efforts culminate during Cultural Heritage Week- a week of speakers, performances, and a K-12 art exhibit. This year our focus has been Native American cultures. Since I had already decided to experiment with choice based art instruction at my intermediate school, I used the "Choose Your Own Adventure" method that I tried out with 5th grade when studying fibers last spring. I came up with several open-ended ceramics projects and each student choose a direction. 
*We only get to do one clay project a year, and this was the first time I ever started the year with clay. I'm not sure if that was the best idea or not, but other than probably 15% of the projects going unfinished, it went pretty well. The students only have art for 40 minutes every other week so their projects have to be built in one day. Since new choices were introduced in following classes, not all students finished their clay (painting with tempera and varnishing) in the second class, and several never got around to it, eventually taking projects home unfinished.
Choice Menus for Native American Inspired Ceramics Projects
I'll be posting about each route, in no particular order. I'm not even going to try to set a timeline because I will not likely be able to stick to it. Two kids at home on a single parent schedule keeps me a lot busier than one kiddo! Anyway, up first are Effigy Pots.
Here is what my research has turned up:  An effigy is a representation of a specific person, especially in three dimensions. Head Pots/Head Jars are one type of effigy pot made by members of the Mississippian tribe. The pots have been found in parts of Arkansas and Missouri. The pot or jar takes the form of a head, usually representing someone who was dead. The eyes are most often closed and the teeth often show as if the tissue is gone. The function of the pots is unclear- it's possible they were "trophies" to represent enemies or that they were a representation of someone who was important or respected (Encyclopedia of Arkansas). I've also found effigy pots that represent animals instead of people.

Other sources
The most common technique students used to make their effigies was starting with a pinch pot, making impressions in the clay with their thumbs for eye sockets, and adding on other facial features. The biggest issue came from students building the pots in their hands and not remembering to check the angle of the face when the pot was sitting.
There were many different interpretations of the assignment. Some students made holes for the eyes and some added them on. Some students experimented with turning their pinch pots upside down to make a hollow head form.
A few students took the animal effigy route. Are cats as popular with your students as they are with mine? One student asked to make an effigy mask instead of a pot and we found that toothpicks worked well for whiskers where clay would have broken.

Monday, May 14, 2012

6th Grade (Bubble Wrap) Dot Painting

If you want a sure way to motivate 6th graders, try using bubble wrap! This project started as an attempt to speed up the Aboriginal-inspired Art lesson I'd taught to my 6th graders the last 2 years. After learning about (Australian) Aboriginal artwork and culture, I'd always had the students draw a favorite animal in a sort of x-ray style and fill in the negative space with symbols and dots. The animals would turn out great, but the students would lose interest during the dot phase and we'd get some half-hearted attempts. This year, we tried using bubble wrap to create the dots! There's something funny about using a material as plastic as bubble wrap to learn about such an old Art form.
I've always been a fan of bubble wrap- it's super fun to print it for texture in mixed media artwork. I made myself a note after last year's lesson to try printing bubble wrap to create the dots in the background. I found some of the most beautiful dot paintings I'd ever seen on this website (seriously, go look NOW!) I think the students were just as impressed by the artwork as I am! With the addition of the new reference images, the rest of the lesson introduction was the same. My original plan was to spend one class printing bubble wrap backgrounds, and the next two adding animals and/or symbols. You'll see if you read on that the lesson evolved as the students' needs and interests came into play.

I have no trouble painting and printing the bubble wrap fast enough. The average student, however, does. We discovered that using a damp sponge to moisten the paper prior to printing yielded better results. Most students were much more intrigued by the dots than by the animals so in the second class period, I gave them a choice. The students could either try the dot painting again, or they could go ahead and add an animal and symbols to their first painting. I had intended for the students to draw, cut, and glue their animals and symbols, but after one student tried painting them directly on top of the dots, everybody really liked that technique!
 I stressed that there was to be ABSOLUTELY NO POPPING OF THE BUBBLE WRAP! And we really didn't have a problem with it. I had purchased a roll of bubble wrap that could be torn into sheets. Recycled would have been great, but this way I was sure to have sheets big enough. The same bubble wrap sheets were washed and reused in each class. By the end of the 2nd class period, after being used about 10 times, the bubble wrap is still in good enough shape to use.
 Here's a 6th grade student showing how to wash the bubble wrap. We gently rubbed the sheet together then laid it bubble side down on sections of newspaper to dry. If there were a way to hang the sheets, they would probably dry faster.
White Rabbit
This student is a cancer survivor and wanted to make a ribbon
This student traced her hand with paint after we learned that Aboriginal artists sometimes used their arms and hands as stencils.
This was made by a student who finished early.

Sunday, February 26, 2012

6th Grade Sumi-e

I was really looking forward to ink working on sumi-e* with my 6th grade students. I made a big deal about ordering the special brushes and real rice paper and sumi ink because I was trusting them to try really hard. This was difficult for most students but I was just as frustrated by the lack of effort from some, as they were by learning a new media. I allowed one class period to practice using the brushes with diluted black tempera paint on regular paper and one class to use the "real" supplies and paint Kansas landscapes. I wanted the students to create landscapes from their place in the style of another place to make it really multi-cultural. 
*In case you were wondering (I had to look it up,) "sumi" is the Japanese word for ink and "sumi-e" means ink painting.

"Practice" painting from the 1st class. I like these better than the landscapes!
The frustration had 2 causes. First, it was hard for the students to translate a photograph into the simpler style we saw in traditional sumi-e. I don't mean "simple" as in easy. I think it is hard to understand how a "simple" style and composition can be harder to plan. You have to get just the right balance. This part was my fault. I demonstrated using the brush and showed some videos from YouTube, but I didn't want to over-demonstrate and have all the paintings look the same. Maybe the students could have used more instruction.
The second cause was that my supply order didn't show up in time so they had to practice with tempera instead of ink. It was really hard for the students to achieve a value range with the real ink so after the first two classes, we switched back to black tempera.

Even though it was hard, and I admitted that I was learning too, most of the students did make an honest effort. Some, did not. I was tempted to bust out a "no-no" board when I saw giant suns and loopy flowers showing up because it translated as a lack of sincere effort. We stopped and talked about effort, craftsmanship, attitude, etc. The paintings I've included here were all by students who were really trying. 

This painting was a major accomplishment! This was the only student to reference the little waterfall photo who actually used directional lines to differentiate between the rocks and the water while still showing texture.

So now I have lots of supplies leftover but I'm hesitant to try sumi-e again anytime soon. I think we'll paint with the ink on top of water and pull prints. I know there is a term for this besides marbling, I just can't remember what it is!