Showing posts with label 2nd grade. Show all posts

Saturday, February 29, 2020

2nd grade Special Event Artwork

One of my favorite prompts for a 2nd grade lesson is
VA:Cn10.1.2 I can create artwork about events in my life.

I give students choice of materials and we talk about adding details to artwork to help visually tell the story. When students are finished, they write a couple of sentences-a paragraph that we can display with their work.


 I love how these artworks turn out every year and this year I even chose one to represent the elementary school at the Kansas Youth Art Month exhibition! I just love the energy and enthusiasm evident in the artwork.

Saturday, October 19, 2019

2nd grade Chagall-Inspired Circus Art


My elementary school chooses a theme each year and this year the theme is Circus! Making art with a common theme or medium is a good way to kick off the school year while still giving students choices. We looked at the art of Marc Chagall who did a whole series of circus paintings. (Read about that here: https://www.christies.com/features/Marc-Chagall-Le-Cirque-series-8862-1.aspx) The students also brainstormed a bunch of different things you might see in the circus before beginning to work.
This poster helped show the students examples of Chagall's circus paintings and joined their artwork  when we put up the display in the hallway.
The students drew directly onto 9x12 inch drawing paper using oil pastels in the first class. I demonstrated by drawing and thinking out loud as I drew, even making a "mistake" so the students could see how I turned it into a happy accident. I talked about adding details and showed how to create textures by rubbing the oil pastel.
In the second class period the students had the option to add watercolor to create a resist effect. Most were excited to try it but some chose to keep their drawings as drawings.
I'll be sharing more circus lessons soon!

Friday, May 15, 2015

Primary Weaving- Collaborative & Choice

I introduced a weaving concept to each grade at my primary school.
Kindergarten- Basic idea of weaving- over-under/ collaboration
1st Grade- Paper Weaving options
2nd Grade- Embellishing options for paper weaving
3rd Grade- Yarn weaving

Instead of asking each Kindergarten student to complete their own weaving project, I really just wanted them to understand what weaving is and to practice the over-under pattern. My first idea was to have each Kindergartener take a short break from their choice project to come to my table and practice weaving one strip in one of the large paper looms (12x18 inches) I'd cut for each class. After each student finished his/her strip, they wrote their name on one of the squares they'd created.

That proved to be a time consuming venture. After two days, a better idea came to me. After the introduction in my last Kindergarten classes, I sent students back to their tables where they worked with their groups to weave strips through 9x12 inch paper looms I'd precut. Not only was it faster, there was teamwork and problem solving. Only one student wove at a time, but they helped each other remember the pattern.

Other than in Kindergarten and 1st grade, weaving projects were optional for the students. Not all of the 2nd graders chose to weave paper, but I think all but a few 3rd graders did because they were SO excited about using yarn. I've found that the easiest looms for students to use are made from foam trays. The space between the suspended yarn and the bottom of the tray makes it easier for students than weaving on a flat surface. We displayed the yarn weaving projects by stapling the piece to a 6x9 inch piece of paper labeled with the student's  name.

Many students tried cutting different designs in the planning of their paper looms. The students who wanted a more traditional grid-like weaving used a precut 1 inch strip to trace the lines they would soon cut.
 Some 1st graders used their paper weavings as an interesting background for something else.
 Here are some 2nd grade projects exploring more ideas for embellishing weavings. From left to right, there is a weaving project with a handprint, weaving through painted paper, weaving through a marker drawing of tie-dye, and circles collaged on top with the letters of the student's name on top.
 Weaving projects with stamped paint on top.
More students want to do extra work outside of class on yarn weaving than on any other project. This student stuck to the rainbow pattern for the entire project. She worked on it in art class for a few weeks before taking scraps to finish it during recess.

Weaving has proven to be a very engaging project for my students over the last few years. Weaving is also one of the lowest cost projects. The looms were made either from meat trays I saved and sanitized at home or from recycled cardboard or mat board. I've also picked up 2 trash bags full of yarn at garage sales for under $5 total. It lasts a long time! I did buy some plastic weaving needles and though they were also very affordable, they are not necessary. Students can weave just using their fingers.

Over the summer I hope to try weaving a pouch. I've seem some lessons online but haven't yet had time to give it a go.

Do your students love weaving as much as mine?

Saturday, May 9, 2015

Recycled Art Challenge (Continued)

In honor of Earth Day, my 2nd and 3rd grade students participated in a "Recycled Art Challenge" where they had 2 class periods and a ton of different "recycled" materials with which to make something. The project could be 2D or 3D, but most went 3D. We saw lots of collaboration and creativity. I already shared a few photos a few weeks ago (see here) but I wanted to share some more photos of the students' art as well as a list of their favorite materials (at the bottom of this post).

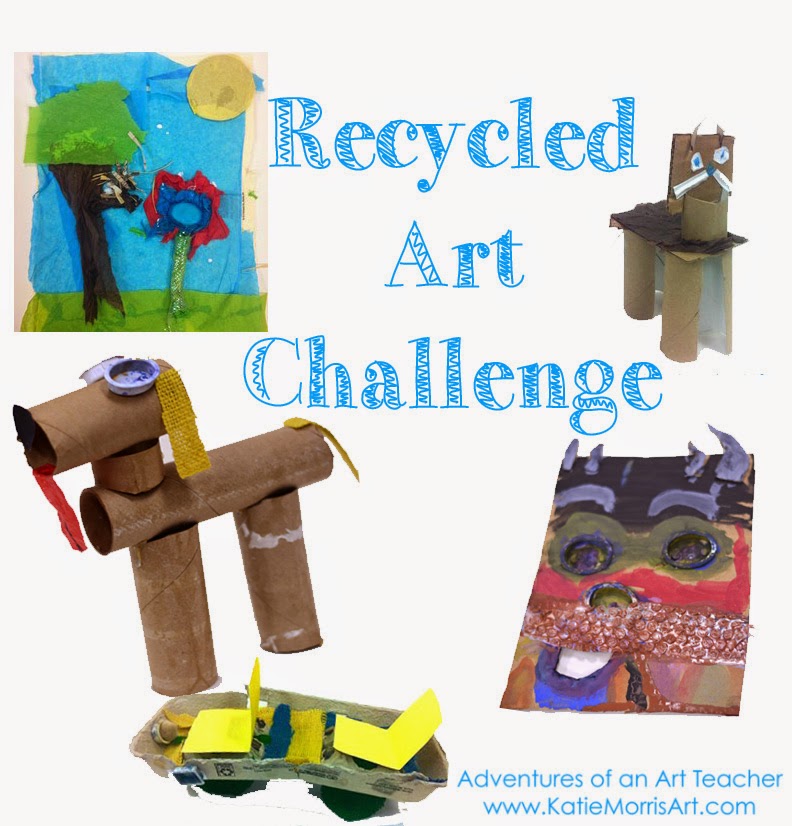
Above we have a pop monster and a collaborative Minnie and Mickey Mouse project. The pop monster (my term) was made of a pop can, 6 bottle caps, a bunch of pop tabs, curling ribbon, tissue paper, and cardboard. Mickey and Minnie were made by two friends. One student made each figure but they worked to make their sculptures match. They used paper towel tubes for the bodies and juice can lids (tons were donated) for the heads. The idea came to them after seeing the red and white polka dotted wrapping paper scraps I brought in. The bow was made from tissue paper and Mickey's shorts were made from scrap paper in the collage center.
There were probably 6 students working on the landscape theme. Some worked with partners and a couple worked individually. They used old file folders as a base and tissue paper, ribbon, can lids, and watercolor wells for the flowers and trees. The nest in the tree on the left was made from leftover shredded newspaper from the Bird Nest lesson I taught 4 years ago. Yes, that's a long time to keep shredded paper, but I bet some of you have held on to random supplies longer than that! :)
Here we have a textured collage and an alligator or crocodile, whichever does not show its teeth with a closed mouth. The alligator/crocodile was made from egg cartons, cardboard, tissue paper, and bottle caps.
 An art creature and glass of lemonade... The art creature has colored pencil stub legs and watercolor well eyes. The lemonade gets color from tissue paper.
One of my ASD students is kind of obsessed with computers. He was always asking if I had any computer magazines for collages and wanted to spend any time he could get away with talking about computers. I was not surprised when he whipped this laptop out for his project. He used a piece of drawing paper for the base, bubble wrap for the keyboard, and some foam packing sheets for the screen. He used cereal boxes to make the frame and buttons.
 Several students wanted to make rooms. The top left shows a folded paper base with magazine cut out pop-ups. The top right is a bathroom. I like the sink the best. He found one of those flattened blue marbles (my elementary school counselor called them dragon tears) for water and used watercolor wells for all the basins after constructing the walls from cardboard.
 Here's another room. The student would have added more details if she hadn't run out of time.
 I should have taken a photo of this project from another angle. She spent a lot of time wrapping the different parts in tissue paper. The stem is a paper towel tube and the leaf is cut cardboard.
 There were lots of "machine" models made. Lots of cars, tanks, cannons, etc. The student who made the above tank figured out how to make it "shoot" marker caps. When he pushes a new cap through, the front cap shoots out!

Here are my students' Top 10 Favorite Materials for the Recycled Art Challenge

  1. Cardboard tubes (paper towel and toilet paper)
  2. Egg cartons
  3. Can lids (with smooth edges, of course)
  4. Bottle caps
  5. Pop tabs
  6. Tissue paper (saved from holidays and birthdays)
  7. Cardboard (saved from boxes)
  8. Bubble wrap (saved from shipments)
  9. Play-doh lids
  10. Parts from old watercolor trays- the wells and the "ladders"
Another favorite material that was not exactly recycled, but was leftover from some project and donated, was burlap! We had it in blue, green, yellow, and red. It was really fun for them. I wish I would have thought to bring more fabric scraps from home.


Saturday, April 25, 2015

Recycled Art Challenge

In honor of Earth Day, my 2nd and 3rd grade students participated in a "Recycled Art Challenge". We started by looking at this self-portrait gif on Tom Deininger's website and talking about why an artist would choose to make art out of trash. Next, we scrolled through some examples I'd collected on my Recycled Art Pinterest board. I had a buffet of materials from which they could choose- cardboard, toilet paper tubes, tissue paper I saved from gifts, bottle caps, and a variety of other items- and after explaining how the supplies were set up and that they'd have two class periods, the students set to work.
 The students worked REALLY hard on this project. I didn't see a single student slacking. There was a lot of collaboration, a lot of advice-giving, problem solving, creativity, and excitement. Several students finished and immediately asked if they could make another recycled project.
 This student wanted to make a park with trash to try to get people to pick up litter and recycle. She even used a glue stick cap as a trashcan and tied up trash inside a teeny tiny little bag.

 I used a hot glue gun to attach some things when students were having a hard time keeping it steady long enough to dry.
I loved this simple dog! The burlap scraps someone donated were very popular. The eyes are made out of watercolor wells.
This student also used watercolor wells to make the eyes and mouth. Instead of gluing them to the flat surface, he cut holes in the cardboard and poked them through.

I think this challenge will be repeated next year at my new school!
I posted this lesson in a bit more detail on the smARTteacher- check it out!

Sunday, January 4, 2015

2nd Grade Indian Elephants

My second grade project for our Cultural Heritage study on India this year involved learning about the significance of elephants in Indian culture and the beautiful block printing method used for textiles. The students created stamps out of cardboard and foam and used that the create a patterned background. Then, the students drew elephants and glued them in the center of the printed background. I typed the lesson up to share on the smARTteacher in November. You can see the complete lesson HERE

1. Introduction
-Briefly talk about India, show location on map
-Explain that art is infused into Indian culture
-Block printed textiles from India are very beautiful and detailed. Explain and look at pictures of fabric and printing process.
2. Show how to make a stamp with cardboard and foam (instead of carving wood like most of the blocks from India.) Remind students that they have to cut shapes instead of lines. "Lines" can be made by cutting very thin shapes.
3. Students cut foam shapes, check with teacher, and then glue to cardboard when approved.
4. Print stamps
-Students choose construction paper
-Use paintbrush to apply black tempera to stamps (this helps my students not get too much)
-Start in a corner and stamp along edges first.
-Talk about how rotating or flipping the stamp can create a different kind of pattern.
-Filling in middle is optional. Just printing a "frame" also looks nice.
5. Introduce Indian elephants
-Look at pictures of Indian elephants and artwork including elephants
-Elephants were the traditional mode of transportation for Indian royalty
6. Make elephants
-Students draw Indian elephants on 6x9 inch white paper
-Trace pencil drawings with sharpie
-Color elephants with crayons or colored pencils
7. Cut out elephants
-Remind students to turn the paper, not their scissor hand, and to be careful with dangly parts like the tail and trunk
8. Glue elephants in center of printed papers
- See more at: http://www.thesmartteacher.com/exchange/resource/1405/Indian-Elephants#sthash.pgcPE7Zu.dpuf

I love how the printed papers turned out. Some students flipped or rotated to create more complex patterns. Lots of good math connections.
A lot of "India" projects I've seen use elephant tracers... while my students' elephants may not look like you'd expect, it was more important to me for them to practice looking and drawing than to have a perfect elephant. Besides, look at all the personality!