Showing posts with label mural. Show all posts

Tuesday, August 30, 2022

Sunflower Mural at Holton Municipal Pool

This summer I had the opportunity to design and paint a mural at Holton Municipal Pool. Part of the plan was for this to be a community art project, so after I had painted some outlines, community members were invited to come participate in painting! The turnout was better than I ever expected with approximately 50 community members, many of them families with young children, coming out to help in just a few hours. 
I went back to finish the painting over the next couple of weeks and was thankful for the help of some friends and family to get the big areas filled in. This is definitely the largest mural I’ve done to date!
Here are some drone photos that my brother took to get a better view of the painting. The octagon was the baby pool years and years ago, which had been filled in with cement. Now the edge of the former pool makes a pretty nice frame for the painting!

Monday, June 1, 2020

Choice Based Student Work from Home

The majority of my students work during Continuous Learning came from choice boards, but some kids asked about doing their own things or were just motivated to give themselves more of a challenge or put more work in, and that is the reason for this post! These are mostly by freshmen in my intro class.
"Can I paint a mural?"
 Uh, yeah! This student got permission from her mom to paint a mural on a retaining wall at her house and it turned out really cool!

"I turned my pixel art into an animation!"

"We have puppies so I painted one."

"I didn't quite finish my comic"
But it is so good!

"Can I paint a wall in my room?"
Go for it!

Sunday, August 30, 2015

Collaborative Mascot Mural

It has been SOOOO busy getting my new classroom set up, finishing up curriculum plans, learning my new schedule and responsibilities, and everything else that goes along with switching schools.

I wanted to take a few minutes to share the project we used to kick off the year and transition into art class. I used the same process a few years ago (I use that term loosely) at one of my previous schools and thought it would work well for high school. Each high school and middle school student completed one square for each class in which they are enrolled. Some finished early and drew extras. I put the lesson up on the smARTteacher for their August challenge so you can read about the whole process there.
The small sections look cool on their own but I really like what we accomplished together.


Wednesday, July 8, 2015

Tennis Mural

The tennis courts at one of the parks in my hometown were recently refinished- great!
 But next to the brand-spankin' new courts, was the ugly old practice wall. The Parks & Recreation Director and I talked about using it as a surface for a mural when I was in high school, but it never worked out. Once the courts were resurfaced, it was the perfect time to tackle the project. I came up with a plan, ran it by him, he bought the paint, and after the old boards were replaced with new plywood, I got started.
I spent Monday morning just drawing everything out. My dad helped me use his chalkline to snap the rays and the lines for the top of the net, then I tried to make a grid to draw out my plan. That was much trickier than I expected with the scale of the project- approximately 10x28 feet.
The next day I was ready for some help. Three wonderful ladies- Kathleen, Suzette, and Carol- from Jackson County Arts helped me throughout that week until we finished up Saturday morning.
The last step was adding the black lines to make up the net. The top of the net was the correct height so that it can be used to practice, but we took some liberties with the spacing on the net, enlarging it to 6 inch rows instead of 2 inches since there was not a realistic scale on the rest of the mural. I made a template- a 6 inch wide strip of cardboard with marks every 6 inches that we used to quickly lay out the knots. We were trying to figure out the best way to paint the lines and found that instead of connecting the dots with a brush, we could use string to print it! I cut a piece of cotton string from the hardware section a little longer than the height of the net. We poured paint in a foam tray, ran the string through the paint, and used it like a chalkline. I held the string in place and Kathleen snapped it, creating a line. The horizontal lines were just done in sections, using the painted knots as a guide.
We are pretty proud of the way the mural turned out and happy to have been able to contribute more art to our community.

Monday, April 27, 2015

2015 Bottle Cap Murals

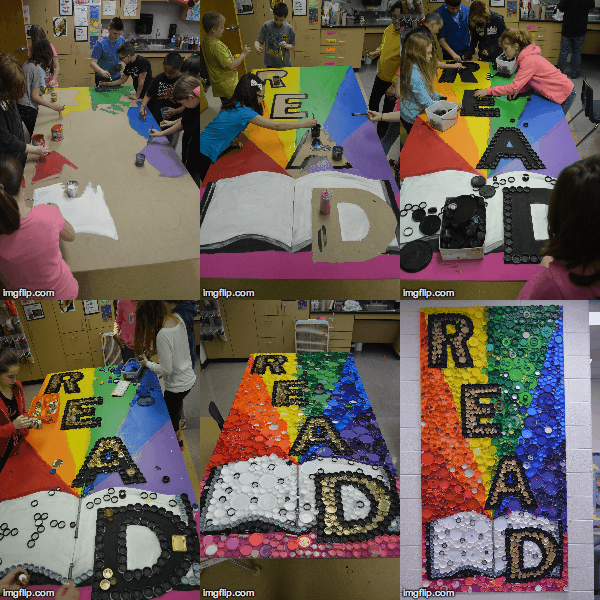
2012 was the first year my Intermediate school created bottle cap "murals". Some were small, some were medium, but this year we went BIG to make two 4x8 foot bottle cap murals that were recently installed on walls in our school. Previously, we'd reused cardboard sheets or other materials donated to us for backing and hot glue. This year, I received a grant from our district's foundation and used that to purchase 2 sheets of MDF and 2 cases of DAP Alex Plus caulking to use as glue. (We had one case leftover)
I'm not sure between the caulking and hot glue which one sticks better. I thought the caulking was working fine, but several caps have had to be re-glued. I had used a caulking gun to squirt it out on cardboard and the students dipped the caps and stuck them down. I think some students just didn't get enough caulking on the back, while others got WAAAAAY too much. The maintenance crew that hung the panels suggested Spikes Special Adhesive and left me a small tube for repairs. It does seem to be sticking really well and is definitely stronger than the caulking. However, I don't know how the cost would compare. I suppose it's another option for someone to look into.
Overall, I was pleased with how things came together. In previous years, I've let the students totally design the panels. This year since I knew they would be permanent, I gave students the option of submitting plans and I had things sketched out before they came. The outer space panel was based on a student's sketch and I designed the READ mural for the library.
Students working on painting and applying caps to the space mural.
The READ mural is my favorite! I have a few caps to replace since some fell off during installation, but it already looks awesome and is a nice feature in the library.
 The space mural turned out pretty good, but has weird gaps. Students said we were out of black caps (found out later they just didn't look carefully enough) so we spaced the caps out. Now there are gaps just a tiny bit too small for me to fill them in. I hung up signs on either side reminding students not to touch but it's a high traffic area so I'm sure it will happen. One of the custodians is talking about using some small screws to secure more caps.

Saturday, September 28, 2013

#DotDay Murals

We had a lot of fun celebrating International Dot Day! After the 1st-3rd grade students finished their contributions to our collaborative mobile, they helped work on one of 3 murals: a play on our school logo, an imaginary solar system, and an underwater scene.
 We looked at a famous painting made of dots- Seurat's Sunday Afternoon on the Island of La Grande Jatte and covered the first mural with pointilist dots. We did cheat and paint the background first given the age of the students.
I laminated the strips so it doesn't photograph well.
The other murals were a combination of paint, stamping, drawing, and collage.
Look at all those planets (dots!)
Helping to tape the pieces together was a popular job.
Painted background with cardboard tube stamped bubbles (more dots!) The little bitty mermaid was one of my favorite details. The underwater mural was the smallest and the only one made on just one big piece of paper. It was the last afternoon and the first two were finished so we started another that could be completed that day.
The students really enjoyed "connecting the dots" and working together on these murals. The teachers and visitors to our school have enjoyed seeing them in the hallway almost as much as the students do.

Friday, July 12, 2013

End of Year Mural

Boy, the end of the school year comes with a crazy schedule. My primary students rarely miss art class on Tuesdays, but the Friday and Monday classes miss out more often due to field trips, in-service days, assemblies, etc. One one Tuesday, my 3rd and 1st grade students painted collaborative murals. I have a large bulletin board in the hallway that I didn't want to leave empty for the remainder of the year once student artwork needed to be sent home. I also figured it might brighten up the place during the summer school session and at the beginning of the school year.
I measured the bulletin board so that I could cut 4 pieces of paper to hopefully fill the whole space. One piece of paper was taped down at each table for those students to work on. The 3rd grade students started with black tempera paint in the morning, filling the space with shapes and connecting the shapes with lines. When they were done laying out the design, the students were given a tray of paint. I had 2 sets of trays with different colors so we switched them halfway through to give more color choices.
During the first grade class, the students finished filling in shapes with colors and went over dry areas again to add more opacity and cover smudges. The last step was to paint over the black lines again. The students were pretty proud of their work and excited to see such a big painting in the hallway!

Sunday, July 10, 2011

Down on the Farm Mural


The K-3rd grade students and I made a temporary mural for Family Fun Night at school back in April. I drew the outline of the big barn and lines for the hills in sharpie on white butcher paper.  If students finished their projects early, they worked on coloring in the drawing with crayons, tearing paper for clouds, or drawing/cutting/pasting farm animals or equipment.  We hung the mural in the hallway with lots of tape and it was enjoyed for the rest of the school year!


Thursday, February 17, 2011

School Logo Paper Mural

Some people who see this in person can't find the picture!  I think it's easier to make out when viewed from the center and at a distance.

Yesterday I wanted to do one-day projects to try and get my classes back on the same schedule after snow days.  I got the idea for the mural from my friend Amy's blog but adapted the project for my students.  Her students had more variety of media but I stuck to my brand new Mr.Sketch markers.  I knew that I wanted to give each student a small section of the logo and show them how to create a grid to enlarge it.  I opened the logo up in Photoshop because that is always the easiest way for me to find the right size to scale the image and to add even lines.  Also, I have the file saved so I don't have to do the work again to use the project in future years.  I printed the logo in black and white so there were pretty much three values of black, gray, and white.  I haven't really done a project focused on value before so this was kind of an experiment.  I asked the students to make the black areas (pretty much just outlines) solidly colored in, fill the gray areas with line and shape designs, and either leave the white areas white or add sparse designs.  I also asked the students to use an analogous color scheme.

This project was completed by two 4th grade classes, a 6th grade class, and me.  There should have been enough students to complete every section.  But the power was out for an hour yesterday morning so the 4th class that I had planned to have work on this had to do a different project.  I figured I would complete a section in each class to demonstrate but I think I ended up finishing 16/72 pieces.  If I hadn't done that, the day would have been kind of a waste.  You can't put up a half-finished mural!  We had conferences today (and last night) so I finished my sections and one of our social workers helped me hang it.

When I do this project in the future...

I will probably stick with 6th grade.  It was tricky for some of them, the 4th graders needed LOTS of help.

I will probably tell the students what they are making.  I didn't tell the 4th grade classes what the "big picture" was going to be.  I wasn't going to tell my 6th grade class but decided to on a whim and they instantly were more interested and motivated!  I forget how much they are into anything with our school logo and it made a big difference!

I will try to figure out how to handle the REALLY simple sections.  Some pieces only had a little line down one side or a small shape in the corner.  One of my students with SUPER low motivation chose a section that was almost empty so when he finished that, I had him take over another section for a student who had to leave early.  And for once, he actually did the work!  (And with little more than a half-hearted protest!)  I was so happy!

I will have the students fold their paper "hotdog" and then "hamburger" style to make a simple grid with the creases instead of measuring.  I had the 4th grade classes use rulers to make their grids and you'd think they've never used one before!  I have vented about ruler issues before and had lots of the same problems again. I showed the students how to find the middle.  I told them that the paper was 9x12 inches.  This is what followed with the first 4th grade class.
Me: What is 9 divided by 2?
Students: 18!
Me: No, that's 9 times 2.  What is half of 9?
Students: 3!  No, 2!
*Frustration*
I decide to draw it on the board and show the students that 9 divided by 2 is 4 and a half.  I asked them what half of 12 was and thankfully they figured that one out a little quicker.  I marked the measurements on both sides and connected them with the ruler.  Simple, right?  Haha, that's what I thought.  Several used the wrong measurement, one even blamed it on me, several used the right measurement but just marked it once in the middle of the paper so it wasn't straight, several even measured correctly but tried to draw the grid lines free hand instead of with the straight edge of the ruler.

I feel a little like a quitter to give up on using rulers (I mean it's a simple but important skill the students should know) but I don't feel like I get enough class time with them to spend as much time as it would take for them to get it...

Another issue was students turning one of their pieces (either the small section or their drawing paper) horizontal and the other vertical which of course doesn't match up.  I don't think a lot of them had the visual-spatial skills yet to take on the more complicated sections.

Monday, May 31, 2010

Mural Project

Step 1: Get funding and permission!  My district has a foundation that raises money to support the schools. Teachers are given the opportunity to apply for classroom grants.  I discussed my idea with my principal, got permission, and wrote the grant.


Step 2: Introduce students to the project.  On the first day of the project, I made a PowerPoint that showed murals from Art History, murals in Kansas that they might be familiar with, and murals that I have painted. We talked about the different reasons that people paint murals and how murals make a big statement.  I told the students that the mural would be in the school after they leave so it was their chance to show what was important to them and what they are "about".


Step 3: Students make drawings/proposals for the mural.  I told the students that I wanted to pull parts from different drawings to make the final design so it would reflect more than one idea.  I didn't give the students a set theme, I just said it obviously needed to be school appropriate and reflect the students or school.  I let the students work with a partner if they wanted (I thought some might be intimidated) and I'm not sure if this was a good idea or not.  Some pairs worked really well together and came up with great ideas, while some let one partner do most of the work.


Step 4: Make the final design.  I sorted the drawings and came up with three different designs.  My principal and I discussed and chose which design would be used for the mural.

Step 5: Buy supplies.  I think I asked for like $330 but I could have done the project for a lot less.  I didn't spend all the money and could have gotten by with a quart of most colors instead of gallons.  I took the design with me and a list of the colors I needed.  The lady who was mixing my paint was new in that department and had a hard time.  First, she mixed the same bright green color in three gallons instead of one.  Next, she didn't get the lid pounded on tight enough for one of my quarts and when I went to put it in the cart, pumpkin orange hit the floor and splashed all over eVeRyThInG!  I guess I was the perfect person for that to happen to since I am used to having paint on me, you have to be patient to be a teacher, and I've worked in retail before!


Step 6: Transfer drawing to the wall.  I started using a grid but adjusted proportions that looked "off" once I got them on the wall.  I taped off the border and put a drop cloth on the floor.  I quickly learned that a drop cloth is not enough and taped paper to cover the exposed portion of the wall close to the floor.  I also was reminded that painters tape isn't perfect on cinder block walls.


Step 7: Start painting with students!  I had planned things with a really awesome Para at school so that she stayed in the art room with students (who were reading their AR books) so I could take about 1/3 to the hallway at a time.  It would have been crazy trying to paint with all 22 students in the hallway at the same time so it worked out really well.  We could not start painting the mural as early as I wanted because of the testing schedule so I probably put in a good 10+ hours finishing up the painting when the students were out of time.


Step 8: Touch up- this will be done when I return to school next fall.  My principal is trying to get a gallon of paint that matches the wall color so I can touch up where the paint dripped or bled through the tape.


Step 9: Feedback!  I had the students take a survey and asked what they learned from the mural project.  I still need to read through all of them but it will help me when I turn in my report about the project to finish up the grant obligations.


Everybody has been super appreciative of the mural and both the students and teachers are making all sorts of plans for future murals!  My principal said that even without a grant, he could get me money to paint a mural every year if I want!  I think I will need more time than a year to recover from the mural but I definitely think it was a valuable project. I might try to do one every three years so each student will get the chance to work on a mural in either 4th, 5th, or 6th grade.