Showing posts with label bottle cap art. Show all posts

Wednesday, June 30, 2021

Bottle Cap Resin Art

Our Art Club didn't have many activities last school year with a change in schedule due to covid. We finally did something really fun at the end of the year- bottle cap resin art! 
I started saving caps from my Starbucks drinks because they are a nice size and don't have serrated edges. Students could do basically anything that would fit inside! We just tried a bunch of different things to experiment and know how it would work in the future. The only thing that didn't work well was a fresh dandelion. In the words of one of my students, "I'm sorry but that's not cute!" 

I think the most successful pieces had layers- either an image on the background with something sprinkled on top or tiny mixed media works. When the resin set up most students added magnetic buttons to the back. A couple decided ahead of time they wanted them to be keychains so we added a loop of wire before pouring the resin and a keychain loop when it was set.
We will definitely do this again!


Monday, April 27, 2015

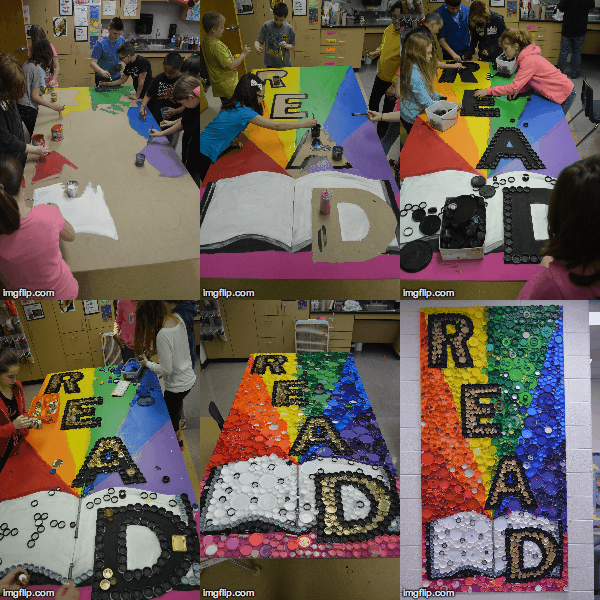
2015 Bottle Cap Murals

2012 was the first year my Intermediate school created bottle cap "murals". Some were small, some were medium, but this year we went BIG to make two 4x8 foot bottle cap murals that were recently installed on walls in our school. Previously, we'd reused cardboard sheets or other materials donated to us for backing and hot glue. This year, I received a grant from our district's foundation and used that to purchase 2 sheets of MDF and 2 cases of DAP Alex Plus caulking to use as glue. (We had one case leftover)
I'm not sure between the caulking and hot glue which one sticks better. I thought the caulking was working fine, but several caps have had to be re-glued. I had used a caulking gun to squirt it out on cardboard and the students dipped the caps and stuck them down. I think some students just didn't get enough caulking on the back, while others got WAAAAAY too much. The maintenance crew that hung the panels suggested Spikes Special Adhesive and left me a small tube for repairs. It does seem to be sticking really well and is definitely stronger than the caulking. However, I don't know how the cost would compare. I suppose it's another option for someone to look into.
Overall, I was pleased with how things came together. In previous years, I've let the students totally design the panels. This year since I knew they would be permanent, I gave students the option of submitting plans and I had things sketched out before they came. The outer space panel was based on a student's sketch and I designed the READ mural for the library.
Students working on painting and applying caps to the space mural.
The READ mural is my favorite! I have a few caps to replace since some fell off during installation, but it already looks awesome and is a nice feature in the library.
 The space mural turned out pretty good, but has weird gaps. Students said we were out of black caps (found out later they just didn't look carefully enough) so we spaced the caps out. Now there are gaps just a tiny bit too small for me to fill them in. I hung up signs on either side reminding students not to touch but it's a high traffic area so I'm sure it will happen. One of the custodians is talking about using some small screws to secure more caps.

Saturday, April 27, 2013

2013 Bottle Cap Panels

 I guess I can now say that bottle cap artwork is an annual project! Last year was the first time we attempted this project with my 4th-6th grade students and they enjoyed it so much that we just kept saving caps and did it again. Just like last year we used cardboard for the backing and hot glue to attach the caps. The only expense for this project was a bit of tempera paint and sticks for the glue guns! A few of the panels were donated to the PTO auction and the rest are now displayed on top of the book cases in the library.
After a presentation where we view lots of examples of bottle cap artwork (you can see most of the images on my Pinterest board) and discuss why artists would want to use bottle caps or other "trash" in their artwork, the students put themselves in small groups and take on jobs that need to be done. Of course I make suggestions when students are unsure, or occasionally make a poor choice, but I pretty much try to let them direct their projects. My "rules" were not to go right to copyrighted/trademarked symbols and to avoid just spelling out letters. I also suggest the students look at what color caps are available to help them get their ideas.

I did let some students break the rules with SpongeBob, only because I was impressed that they used a pill bottle as a nose. He was a lot less lumpy before the 4th graders finished gluing. :) The hardest part is for students to put caps back down exactly where they were before they applied glue. 
We started off trying to paint the background of every board, but by the time some of the projects were laid out, we decided to glue them directly to unpainted cardboard. The painted backgrounds look nicer but we wouldn't have finished much if we didn't alter the plans.
 One group of students was set on making a mustache. We were out of black caps so they tried blue. It looked more like a seahorse so we changed it into one in the next class.

I was so sick of peace signs! I think that 4 or 5 different classes tried to fix it, changing the colors, changing the shape, etc. and I was about to suggest they just move on to another idea since it obviously wasn't working when finally one group made a design and stuck with it.
...and when you don't have enough of the colors you need to make a recognizable picture, you just make a nonobjective design!

Next year I'd like to try to get a piece of plywood donated and make a more permanent mural to be displayed somewhere in the school. For that, I'll probably let students submit design ideas to make it more organized.

Thursday, April 5, 2012

Bottle Cap Artwork

The last 2 weeks have been dedicated to bottle cap artwork with my 4th-6th grade students. The students were, overall, very engaged and excited. I only had a couple panels planned out ahead of time, the rest were designed by small groups of students. The students designed the panels by arranging caps on the boards (a few were large cardboard pieces, most were foam core panels the daughter-in-law of a teacher pulled out of the trash bin at her office) to see if it would work. When they were "done", I checked and made suggestions. If it passed inspection, I moved the panel from a table to a "gluing station". We used glue guns, which went very well considering it was the first time some of the students used a glue gun. I know that hot glue is not going to be a permanent fixative for these panels, but it was cheaper than buying boards and screws. I'm hoping they'll last at least a couple years if handled with care. I have no idea how many glue sticks we used, but it was a lot! I think we went through 100 mini glue sticks just yesterday and today (9 classes).

We ran out of a few colors today and had to improvise a bit. One panel, that because a little unrecognizable after the gluing, was disassembled so we could use the caps again. Purple seemed to be the least common color. We still have tons of red caps that our wonderful lunch room workers saved, and even washed for me!
This was definitely a team effort. Some students were painting backgrounds while others were arranging, and still more were gluing. The next class picked up where the previous class left off. I told the students if they were being responsible, respectful, and working quietly, I would let them choose how to contribute. I really only had to redirect a few! The bad part of this process, was that a small group might have worked really hard to make an awesome design, and had to trust someone else to finish it. It was fine most of the time, but not all my students put as much work into good craftsmanship. The baseball, pictured above, did not so much resemble a baseball in the end. It kept getting more and more lopsided when students were not putting the cap back exactly where it came from.
This was a problem solving opportunity. At first the "create" sign was in all red letters. Nobody could read it, so we changed to a rainbow color scheme and filled the background with white, which just so happened to be our most plentiful color.

When I looked at the end of the day, I was so impressed with what my students accomplished! 
 Only a couple of these were my ideas. I said no KU or KSU signs, and it obviously had to be school-appropriate. Some ideas didn't come together and were not glued. These were the panels that ended up being finished!
Gold Fish
American Flag
Titanic
Golf Ball
Moon and Stars
Red Flower
Cat (it became a little disfigured when glued)
Shine
Dog
Snail
Flower
Apple
Fruit
Tree
Pac Man
Breast Cancer Ribbon
Love
Yin Yang 
Art