Showing posts with label construction paper crayons. Show all posts

Saturday, September 22, 2018

8th Grade Koru

In June 2017 I attended the NAEA western Region Leadership Conference and one of our breakout sessions was a lesson on koru- spiral designs representing new life, growth, and peace to the Maori people of New Zealand. 
I taught a similar the lesson to 8th graders last year and ended up changing a few things and leaving it for the beginning of this school year when I was in maternity leave. 
There was a slides presentation to introduce the culture and concept to the students...

Then they start to design. This year I asked the students to trace their designs with glue on black paper and add color with construction paper crayons. They turned out pretty cool, especially after the students chose a color of construction paper to mount the work on for display.

Sunday, November 9, 2014

Rangoli Drawings

This year the focus for Cultural Heritage Week in my district has been India. Each art student in the district, K-12, has made artwork inspired by the culture of India. My K-3rd grade students each had a set assignment and the 4th-6th grade students had multiple starting points from which to branch out and choose a direction. 
3rd grade students learned about rangoli, which are created during Diwali celebrations. You can find the lesson plan on the smARTteacher, but I'll go ahead and post the basics below.
Start with square construction paper. I cut down 9x12 inch paper to 9 inch squares. I went ahead and chopped the scraps into 1 inch strips that will be used for paper weaving.
Trace a circle in the center of the paper. We used big cans from the lunch room. Place a dot in the center of the circle and 6 or 8 dots evenly spaced around the perimeter.
Next, students create radial designs. I describe it to them as making a pizza where each slice is the same. After the designs are planned in pencil, students add color with construction paper crayons or color sticks.  True rangoli are usually created by drawing with sprinkled powder or paste onto the ground. I wanted students to be able to get part of that experience so after they finished coloring, students had the option of tracing part of their designs with glue and sprinkling sand over the top.
 Only one or two students decided not to add sand. Sand is always a big hit!
We loved how this project turned out. India is such a colorful culture and the students have been so excited to learn about it.

Sunday, December 9, 2012

2nd Grade Asian Dragons

 My 2nd graders learned about Asian dragons during our East Asian study this fall. I used the same PowerPoint with 2nd grade and the 4th grade dragon lessons. 
 Dragons
Dragons are a great way to show the students how the "same thing" can be very different in another part of the world. After the PowerPoint presentation, I showed a video of a Chinese street vendor making a sugar painting of a dragon. Today I found a shorter version of the same vide. Seeing how this man draws a dragon in about 2 minutes using flowing lines was really helpful.
The students could draw any style of Asian dragon they wanted to. We reviewed the number of claws- Japanese dragons have 3 claws, Korean have 4, and Chinese have 5- and the students decided where their dragon should be from. The dragons could be any color or pose, as long as they were Asian style instead of European.
I originally planned to have the students draw their dragons on the black construction paper, outline with color sticks so it would be easier to see, then paint parts with tempera paint. I only did this on one day because the students were having a really hard time controlling the paint. The classes that started with tempera ended up needing an extra day while the others were done in 2. In the other classes, the students used construction paper crayons and/or color sticks to complete their dragons and then if there was time, I let them add touches of metallic gold paint. Dragons are magical, after all. The metallic paint was a HUGE hit and it cost me less than a dollar to let all 130-ish 2nd graders embellish their artwork. I just picked up a small bottle of acrylic craft paint at WalMart and even have some leftover.
I don't have photos yet of the top dragons since I was in a hurry to get them to the Cultural Heritage Week art show and following display at our district office. I'll try to add photos of my artwork "winners" when I get them back in January.
Students checking out dragons at the Cultural Heritage Week Art Show.

Wednesday, November 21, 2012

3rd Grade Oaxacan Inspired Drawings

This lesson was one of my student teacher's greatest hits. The students learned about Oaxacan wood carvings then made drawings inspired by the artwork. The students had to think about composition, colors, and how to fill their animals in with patterns. You can see some amazing wood carvings HERE and read more about Oaxacan artwork HERE.
This project also made me think of a piece of advice I wish I had thought to mention earlier: Don't give too many examples! When asking the students to think about an animal to use, she threw out several random animals in each class. The problem is that a big chunk of students in each class latched on to one of her examples. We had classes with LOTS of jellyfish and snakes. That's something I'm filing away for if I ever have another student teacher!

Saturday, August 18, 2012

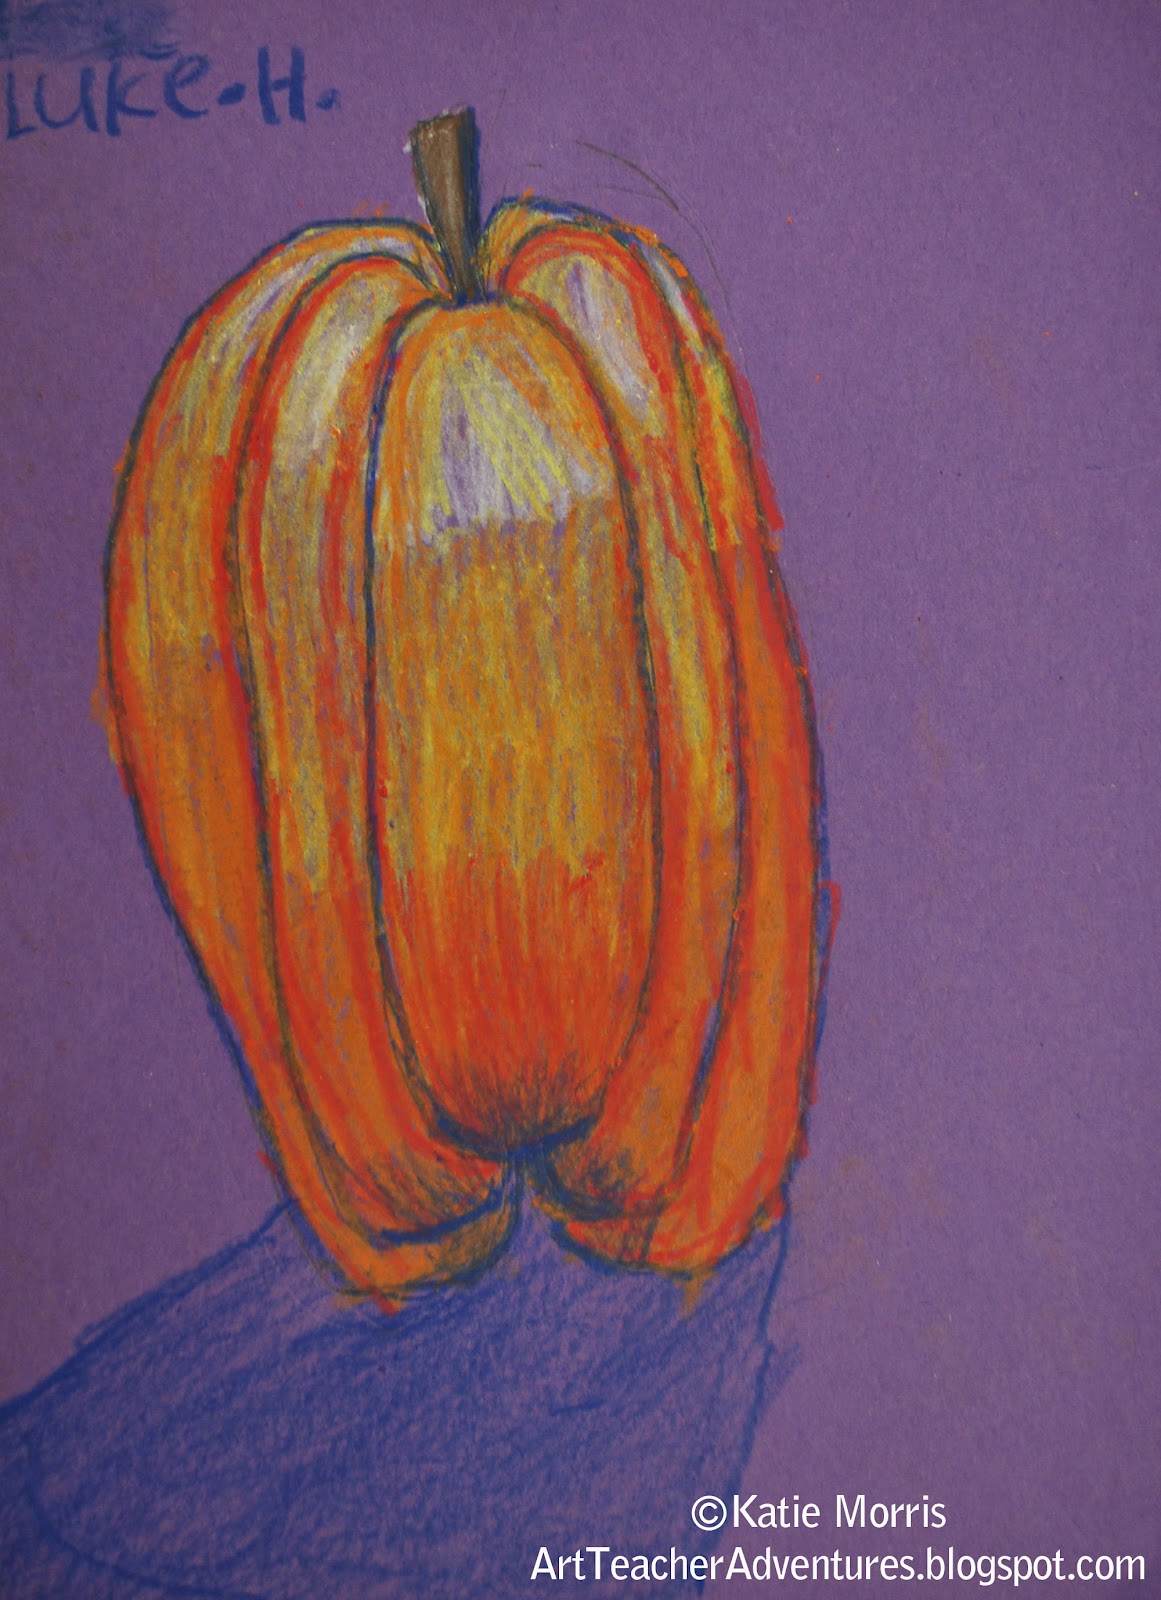
2nd Grade Value Pumpkins

 Last year one of my goals was to really work on achieving a bigger value range with students, starting with 2nd grade. This 2nd grade lesson was definitely more skills-based than creativity-based. The students each drew a pumpkin then followed along as I showed how to use a variety of colors to achieve value.  It was great to see the students concentrating on adding more value on their own in subsequent art projects.
To add color, we worked light to dark starting with white crayon at the top of each section, and working downward, blending each successive color- white, yellow, yellow-orange, orange, pink-orange (there's no "red" in construction paper crayons for some reason.) It is important to color in each section separately and NOT across all at the same time. After the first layer, we went back and added more white at the top following the curve of each section, then blue at the bottom, following the curves up. Next, we added a shadow below the pumpkin. Students who had time were able to add any details they wanted to the background but for some reason I don't have many photos of pumpkins with backgrounds. You'll just have to use your imagination. :)
We used construction paper crayons on purple paper. I'm sure if we had used oil pastels, we would have been able to blend the colors more, but the few times I've used oil pastels with my students, EVERYTHING just ends up dirty. I'm not just talking about messy hands and tables, those I can handle. The oil pastels and the artwork just looks dirty when the little bits of other colors get mixed in. Still, I should probably give oil pastels another shot.

Wednesday, August 8, 2012

Leaf Abstractions

I picked up this lesson at a KAEA conference workshop 2 years ago (I think led by SRA). I've taught it to 2nd graders the last 2 years- would you have guessed?
I think they did a phenomenal job. Last spring we wanted an art project to pair with an Earth Day book "Gilbert Goes Green" by Diane deGroat before she visited. I suggested this leaf lesson. I photographed the steps of my example to create a handout for the classroom teachers since the project would be created in their home rooms. After I presented an overview to all the 100+ 6th graders shoved into the library, it was handy to have a visual reminder to send with them. The 6th graders did a pretty good job, but I honestly prefer the 2nd graders' projects! Since I wasn't there, I'm just guessing that some of the 6th graders either tried to do too much then rushed through it or just plain over-thought it. Having said that, I think this lesson could be tweaked for any intermediate-secondary grade level.  I actually want to make a large painting using this process.
To begin the lesson, I have the students choose a leaf to observe. (6th graders were responsible for bringing their own and 2nd graders chose a leaf that I brought in.) We talk about the shape, the lines of the veins, the textures, and look for specific details like holes. We talk about what the veins in leaves are for, and if teaching the lesson in the fall, what makes leaves green then what makes them change color. 
These drawings were completed on colored construction paper. 
BEFORE THE STUDENTS START TO DRAW: explain to them that abstracting an image means you are starting with something real but altering it. This means that the drawings do not have to be exact copies of the leaves, the leaves are just a starting point for the lines and shapes.
The first step is to identify the "primary" vein that starts from the stem and carries through the to the top of the leaf. This line is drawn from top to bottom of the paper. The students' first choice can have a big impact on the final composition. They have to choose whether to make the vein centered or off-center, more or less vertical, or at an angle. I usually suggest that they make this first line a little thicker so it's easier to keep track of.
Next, look for the "secondary" veins that, depending on the type of leaf, will start from the base where the stem connects, or start at the primary vein and go out to the sides. It's a good idea to stretch these lines to the sides of the paper to make sure the space is filled. Thirdly, add more veins and negative space- where the edge of the leaf shows. Make sure the veins extend to other lines to form shapes. The last step for drawing is to add other details like cracks, holes, etc., then trace all the pencil lines with a sharpie.
We saved color for the 2nd class period. The students used a mixture of construction paper crayons and regular crayons. I demonstrated pressing hard to outline the shape, then coloring more lightly in the center to create value. I ask the students to think about their color choices (ex: analogous colors might help create harmony) but I don't restrict them other than asking that the same color not be used in shapes that are side by side. It's also a good idea for students to use a new color for the negative space behind the leaf. 

Tuesday, April 26, 2011

Bulletin Board Ideas

My crayon bulletin board is featured over at Bulletin Board Ideas!  They also cleared up the authorship of the poem (Written by Shane DeRolf and later published in the children’s story The Crayon Box That Talked.)  I saw some other cool ideas for bulletin boards on their website.  I also saw one I recognized from Mrs.Picasso's Art Room- Check it out!

Sunday, March 6, 2011

2nd Grade Cityscapes


2nd grade students made cityscapes inspired by Wayne Thiebaud's painting, Apartment Hill, 1980.  (Nelson-Atkins Museum of Art)  You may never have seen this painting before.  I happened upon it when visiting the museum a couple of years ago and thought it was cool and a different subject from Thiebaud's most popular paintings.  I liked the results when I did this project last year so I kept it pretty much the same. 
Day 1: Introduce the artist, discuss the artwork (describe, analyze, interpret, judge), students draw 1-3 buildings with pencil on black construction paper to be traced with bottled glue.  Ask students to leave a "pinky-width" between shapes so the glue does turn into a big blob.

Day 2: Use construction paper crayons to color in all the shapes.

I'm a sucker for construction paper crayons on black paper and the added texture from the glue makes it more interesting.  The kids really enjoy this project too.  If a student missed the first class, I had them draw their lines in shapes with a white crayon then follow the same procedure for adding color as if the white crayon were glue.


Sunday, October 3, 2010

2nd Grade Spider Webs

I had decided to start off every grade, K-3, with a line project this year.  I was trying to think of places that you find lines in nature and came up with spider webs.  My husband was surprised that I chose a spider project since I a have a totally irrational fear of them, but I still think their webs are fascinating even though I find them really creepy!

We started off reviewing line as an Element of Art and listed all the different kinds of lines we could think of.  As the students listed, I drew on the line on the board and we all drew in the air with our fingers.  Next, we reviewed proper painting technique, I demonstrated, then gave everybody a piece of 8x10 inch black construction paper.  While the students wrote their names on the back I passed out white tempera paint and paper towels to each table.  If I remember right, I made the students show me their names/teacher code on the back of their papers before I gave them a paintbrush.  It is the only way I can make sure they actually write it down!


 I asked the students to start by putting a dot somewhere in the middle of their paper.  From that dot to the edge, they were supposed to paint 4-6 straight lines to divide the paper into sections for their webs.  We talked a lot about how to hold the brush and trying to make long, smooth lines instead of going back and forth and ending up with really thick, fuzzy lines.  After the paper was sectioned off, the students filled in each section with a different kind of line.  I had showed the students how they could rotate their paper to reach the sections easier and to avoid smearing the wet paint by reaching across and painting at awkward angles.  We ended up taking two class periods to paint so everybody had a chance to finish without rushing.

During the third class, we talked about spiders!  We discussed that spiders have two sections in their body, eight legs, and eight eyes.  I showed the students how a spider's body could be made out of two circles or ellipses.  The students went to work cutting shapes from scrap construction paper.  They cut shapes for the two sections of the body and legs.  After their spiders were glued down, they used construction paper crayons to add details to the spider and bugs caught in the web.  Some students had extra time and added even more details with paper, like designs on the body or hats (haha) that were popular in one class.  If students missed the second class period, I had them finish their lines with a white construction paper crayon before making the spider.

Check out some of the results below or view the exhibit in our Artsonia gallery!



Wednesday, March 10, 2010

Night Drawings

In my smallest class of about 10 students, mostly Kindergarten, we looked at Vincent van Gogh's The Starry Night and talked about the colors he used to make it look like nighttime.  That was about all their little attention spans could handle so I gave them black construction paper and construction paper crayons and told them to draw something at night.  I only have permission to photograph a few of their drawings (I just use the same policies as for Artsonia on my blog) so here they are!


This little guy's drawings are PERFECT for this kind of drawing!