Tuesday, July 26, 2011

Altered Books

altered book left pagealtered book insidealtered book coveraltered book right pagealtered book spread

Altered Books, a set on Flickr.
I recently finished my first altered book! I've been wanting to try it for a few years but finally found the right idea for finishing one book. I set it up to stay open to this two page spread and I have another book that I will try out different ideas in and will be able to flip through.

Next month, I will be making a little presentation on altered books to my county Arts organization. I have been using Pinterest to collect different examples to show and it has worked great so far. You can see the altered book examples I've collected so far here: http://pinterest.com/katiemorris/altered-books/

Sunday, July 24, 2011

4th Grade Dimensional Paper Pictures


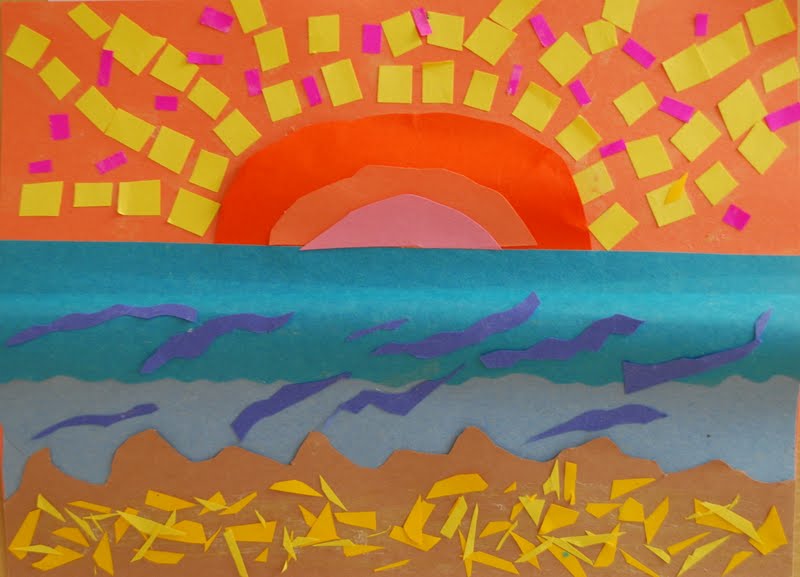
This project was an experiment with my 4th grade students... Not in that we were doing a new lesson (we were,) but in how we worked on problem solving.  I am sometimes too quick to just give students an answer when I should be challenging them to come up with their own solutions.  I also purposefully did not make a finished example because I wanted the students to make their own choices instead of the same choices I made.  Sooo, I explained the assignment (make a picture of a still life or landscape out of construction paper that is three dimensional) and showed the students a few techniques like tearing, curling, crumbling, folding, to create texture and dimension.  I reminded the students that they might have to make tabs to attach the paper and let them get started.  When a student asked me a question, I didn't answer it right away.  I tried to ask them questions to guide them to a solution or encouraged them to ask classmates that looked successful what techniques they were using.  

Honestly, this freaked out a lot of my students.  I think if I work harder on questioning the whole school year instead of just trying it out at the end, it would go more smoothly.  But hey, this blog isn't just about success stories, I'm trying to include my learning as I go.

This was a two class period project.  At the end of the second class period, I had a student say, "Hey, this looks kind of cool at the end!"  I guess that's why it's good to have a finished example, so the students can see where they are headed.  I just get so frustrated when students copy my work because they think it is THE right way to do it.  Even if I take the example down after I show it, I still have students with apparently photographic memories that copy it.  And if I catch them in time, I make them change something so it's different than mine.  Unfortunately, I don't always see it until they are mostly done!

I also touched on foreground, middle ground, and background to create space but it didn't click with most of the students.  Something else I need to do a better job of next year!


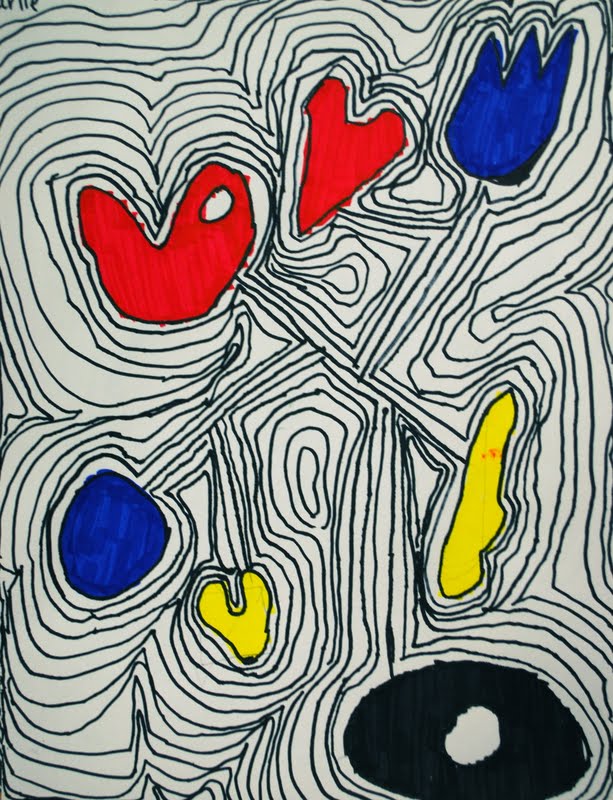
This student incorporated mini origami birds which I love!

Friday, July 22, 2011

The Color Of


Have you heard of "The Color Of" yet?  I just saw it yesterday on Twitter and I have been having fun trying it out.  From their website,
This is a system created to find out the colour of anything, by querying and aggregating image data from Flickr, a popular online photo sharing community. It is an attempt at answering a potentially complex and abstract question in an objective manner, by using simple algorithms on data originating from subjective human perceptions.
THE COLOR OF uses an averaging algorithm on the colour pixel values of the queried images, displaying the result incrementally as each picture is loaded. Taking the assumption that random images will average out to become grey, we can attribute any colour bias which deviates from grey, to the term as searched. Any further interpretation is then up to the user.

So basically, you can search for just about anything and it shows you what "color" the term is as a result of compiling lots of images.  I think it's pretty interesting and fun!  I also think it has some possibilities in the classroom.

You could use it as a starting point for color symbolism...


It's fun to search for artists, movements, and even specific works of Art...


Or even sounds!


I see a lesson plan inspired by this in my students' future!

Sunday, July 17, 2011

6th Grade Relief Sculptures


I love relief sculptures.  I like them personally because I am much more comfortable with two dimensional artwork and they are closer than sculptures in the round.  I like them for school because it is much easier to store 110+ projects when they are fairly flat than big bulky sculptures would be.  I made a relief sculpture totally out of cardboard for an assignment in my 3D design class in college.  If I taught older students, I would totally give the assignment for a cardboard relief sculpture.  Since I was a little leery of giving box knives to my 6th graders, we took the assemblage route.

My cardboard relief sculpture.
I had my mom save cardboard pieces for me that come in yogurt cases at Walmart.  The benefit of this is that I had a whole bunch of cardboard pieces that were already roughly the same size.  It saved me a ton of time since I didn't have to cut the cardboard down.  What did take some time, or at least some forethought, was collecting other materials.  I saved bottle caps, egg cartons, cardboard tubes, even dried up sharpies and pencils that were too small to use anymore.  I scavenged the dumpster at the cabinet shop where my dad works for small wood scraps and collected shells, pine cones, and "gum balls".  I tried to get students to bring found/recycled materials from home but none remembered so I was glad I had been saving anything small and lightweight that could be glued to cardboard. 


Regular bottled glue worked great to attach objects with a flat surface for glue.  We did have some hot glue guns set up for more irregular objects.  We had one class period to construct the sculptures so I ended up running one of the glue guns for students who were struggling to move fast enough or afraid of burning their fingers.


During the second class period, the students covered the entire surface with white tempera paint.  In the third class, the students chose a color of house paint left over from our mural last year to cover the entire surface.  I limited the students to a monochromatic color scheme to show them how color can unify a composition and to remind them of Louise Nevelson's sculptures that I showed to introduce the project.
*We probably could have skipped the white tempera paint step.  The house paint covered so well that it wasn't really necessary.


I put gallons of paint out on the front table with cups of each color in front.  The students rearranged themselves to share paint and I poured refills when needed.  This process worked pretty well and I actually don't think we had any major spills.


I learned after photographing the still-wet sculptures in the first class to remind students to make sure they drained any hidden paint.  The big round thing on the right side is the strainer lid from one of those fresh mixer pasta things- it had totally filled with paint so we were surprised when we turned it vertically!


Thursday, July 14, 2011

1st Grade Mobile Marker Drawings


I used Calder.org to introduce my first grade students to Alexander Calder's artwork, focusing on his mobiles.  The website is so comprehensive that I just used it instead of making a PowerPoint.  We mainly focused on the shapes he used during our discussion.  I drew examples of different shapes he used on the chalkboard for reference.  For the studio portion, I first asked students to draw 5-7 shapes that look like the kind of shapes Calder would have used.  (I try to teach the students the difference between being inspired by something and copying something.)  We talked aboout negative space and I asked them to put a "hole" in one of their shapes.  After the shapes were drawn, I showed them how to connect the shapes with lines.  *I recommended that they not form a ring by connecting the shapes in a circle.  I checked the drawings at that point to make sure there were no floating shapes and that they had drawn big enough.  When they were ready, I gave each student a sharpie to trace over their pencil lines.


Last year at this point in the project, the students painted with primary colored tempera paint.  This year we still reviewed primary colors but we tried out our brand new Mr.Sketch markers! (One thing I'm glad I ordered.)  I showed the students how the markers have a square tip and you can make wide strokes like you are painting a wall for the big part of the shape and just use the pointy tip for really skinny areas.  I'm thinking this will make the markers last longer since it reminded the students not to layer and layer and layer the ink.  I was very impressed with the quality of the markers.  Anywho...


After the shapes were filled in, I showed the students how to trace around the larger shape created by the smaller shapes.  We compared  it to ripples or concentric circles.  The students kept "echoing"the shape, leaving a small gap, until all the space was filled in.  They worked from the middle > out, then outside > in to fill in for any closed off spaces.  I think the lines made much more interesting visuals this year and the students were so proud when they finished!  This was actually a very calming process so that was a bonus!

Sunday, July 10, 2011

Down on the Farm Mural


The K-3rd grade students and I made a temporary mural for Family Fun Night at school back in April. I drew the outline of the big barn and lines for the hills in sharpie on white butcher paper.  If students finished their projects early, they worked on coloring in the drawing with crayons, tearing paper for clouds, or drawing/cutting/pasting farm animals or equipment.  We hung the mural in the hallway with lots of tape and it was enjoyed for the rest of the school year!


Blogger- How To Add Pages

A long time ago, I saw how to add pages to a blog and for the life of me, I could not remember where I saw it!  I finally found it again yesterday.  If you want to add a stand alone page to your blog (like about me, etc.,) you follow these simple steps:
From Blogger click the Posting | Edit Pages tab, then click New Page. (Note: you can create up to 10 pages.)


I found the information here: http://buzz.blogger.com/2010/02/create-pages-in-blogger.html


I know follow so many Art and Art Education blogs that I didn't like how the list looked on my sidebar.  If you are looking for more blogs to follow, check out the "Other Art/Education Blogs" tab at the top of my blog.  I may play with adding some other pages in the next week or so.

Saturday, July 9, 2011

Family Fun Night


Every spring PTO at my two schools has an event called "Family Fun Night".  It is a fundraiser for PTO- they sell tickets for admission that includes a meal and access to "booths" with different activities.  I was asked to run an Art booth this year so I was trying to come up with a quick project for multiple ages that fit the "Down on the Farm" theme.  I tried searching the internet for ideas but couldn't find anything I liked.  I found lots of projects where everybody made exactly the same thing but if it was going to be called an Art booth, I really wanted them to make Art.


I decided to cut out simple shapes that could be combined and printed to make farm animals.  I figured out how to make a cow, a horse, and a pig.  I cut the shapes out of thin craft foam, brushed paint on the shapes and stamped them, then added details with more paint and crayons.  


Here is how I set up the room in case you ever need to do something similar
I had a sign on the table closest to the door with instructions to take a piece of construction paper, write your name on it, and pick a table for the farm animal they wanted to make.  I printed a simple sign with the name of the farm animal (cow, horse, pig) and a clipart picture of it hanging from the crayon banks I have over each table.  That was really helpful when the room got crowded as the students and families could still see their choices.  Each table was covered with butcher paper that could just be thrown away at the end of the night.  At the tables, I had printed instructions for a guide.  (Obviously since it was a fun night and not an assignment, the students could kind of do their own thing.)  I ordered some large, shallow trays to use for printmaking next year so I was able to just squirt the tempera paint colors for each animal on the correct table.  I also put the shape stamps, brushes, and an example at each table.  One table just had tubs of crayons so the students could add details when the paint dried a little.  Some students just chose to draw with crayons instead of using the paint!  I put long strips of paper on the floor so the wet projects could sit there to dry and be picked up later.  I had someone announce over the intercom that projects had to be picked up by the end of the night.  I did not want to mess with trying to sort projects and get them passed out at each school.


Some printed, some painted, some just drew.  Each animal was different and the students and parents had fun making Art!