Showing posts with label relief sculptures. Show all posts

Tuesday, July 10, 2012

5th Grade Faux Metal Pendants

The end of the school year almost always leaves me with an uneven schedule- depending on the grade level and day of the week and if we've had to reschedule for field trips/assemblies/field day, etc., there is usually a need for some one class period projects. This is the first jewelry project I've ever taught at the elementary level and the students were SO PUMPED! They got to design and create a piece of jewelry and wear it home the very same day.
Last year I tried out a bas relief sculpture lesson where the students cut and layered cereal box cardboard, covered with foil, and embossed. None of us were super into that lesson, but I couldn't get the idea of shrinking it down into jewelry out of my head. We can pretend they are sweat soldered pendants. :)

To introduce the lesson, we talked about why people wear jewelry and covered: fashion, status (rich, royalty, etc.), symbol (wedding ring), safety/protection (medical alert, St.Christopher's medal, etc.) and probably a few other categories that I could tell you had I written this in May instead of July. We looked at a few photos of jewelry online before I launched into a really quick description of relief sculpture, a basic demo, then the students got right to work. I had precut squares and rectangles all around 2 inches in size for the base, then had scraps from lots of other cereal boxes that the students used to make their layered designs. Before covering with a piece of foil, the students had to decide how their pendant would hang and punch a hole. After embossing, the students chose a piece of yarn and started modeling. Some early finishers were eager to make another piece right away.
 This worked pretty well as a 40 minute project, but I would love to stretch this to 2 class periods to spend more time on history and design. I think most students would benefit from making a few thumbnail sketches and talking about which design is strongest before beginning construction.

Sunday, July 17, 2011

6th Grade Relief Sculptures


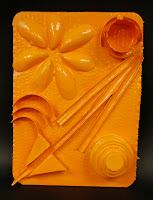
I love relief sculptures.  I like them personally because I am much more comfortable with two dimensional artwork and they are closer than sculptures in the round.  I like them for school because it is much easier to store 110+ projects when they are fairly flat than big bulky sculptures would be.  I made a relief sculpture totally out of cardboard for an assignment in my 3D design class in college.  If I taught older students, I would totally give the assignment for a cardboard relief sculpture.  Since I was a little leery of giving box knives to my 6th graders, we took the assemblage route.

My cardboard relief sculpture.
I had my mom save cardboard pieces for me that come in yogurt cases at Walmart.  The benefit of this is that I had a whole bunch of cardboard pieces that were already roughly the same size.  It saved me a ton of time since I didn't have to cut the cardboard down.  What did take some time, or at least some forethought, was collecting other materials.  I saved bottle caps, egg cartons, cardboard tubes, even dried up sharpies and pencils that were too small to use anymore.  I scavenged the dumpster at the cabinet shop where my dad works for small wood scraps and collected shells, pine cones, and "gum balls".  I tried to get students to bring found/recycled materials from home but none remembered so I was glad I had been saving anything small and lightweight that could be glued to cardboard. 


Regular bottled glue worked great to attach objects with a flat surface for glue.  We did have some hot glue guns set up for more irregular objects.  We had one class period to construct the sculptures so I ended up running one of the glue guns for students who were struggling to move fast enough or afraid of burning their fingers.


During the second class period, the students covered the entire surface with white tempera paint.  In the third class, the students chose a color of house paint left over from our mural last year to cover the entire surface.  I limited the students to a monochromatic color scheme to show them how color can unify a composition and to remind them of Louise Nevelson's sculptures that I showed to introduce the project.
*We probably could have skipped the white tempera paint step.  The house paint covered so well that it wasn't really necessary.


I put gallons of paint out on the front table with cups of each color in front.  The students rearranged themselves to share paint and I poured refills when needed.  This process worked pretty well and I actually don't think we had any major spills.


I learned after photographing the still-wet sculptures in the first class to remind students to make sure they drained any hidden paint.  The big round thing on the right side is the strainer lid from one of those fresh mixer pasta things- it had totally filled with paint so we were surprised when we turned it vertically!