Wednesday, July 31, 2019

Digital Paintings with ProCreate

In the last couple of years we were able to acquire some iPads and apple pencils for my art program. The first one was purchased with our Art Club account and the others were purchased with a grant. I currently have 3 that the students take turns using. ProCreate is one of our favorite apps. I've been trying to use it to create my own digital paintings so I understand it better and have examples to show the students. For about a month I completed a digital artwork for the IllustrationFriday.com prompt and I hope to do that again when school starts.
Here is a video of one of the first digital paintings I made. There is no sound but you can see a sped up version of the process I used.

Here are a few other illustrations I created.
I think this one was something fairytale-ish but I can't remember the exact word
flight
galaxy
I encouraged students who wanted to learn to start by drawing on top of one of their photographs. Here is the process:
1. Line Drawing
-create a new canvas in ProCreate
-import photo and resize/arrange in place
-create a new layer on top of the photo
-under the "inking" brushes, select technical pen or studio pen
-change color to white or something that will show up on top of the photo
-"trace" the image, creating a line drawing with important shapes and details
2. Begin to paint
-create a layer BEHIND your line drawing and ON TOP OF the photo
-select a brush and a color that match your image and begin to paint in the shapes
-you can either start with a more textured brush or something simple like the round brush- it just depends on the look you want
-adjust the brush size to something appropriate for the shape
-turning the opacity down can yield a more "painterly" effect
3. Layers
-it's a good idea to make different layers for different sections of your painting
-every once in a while, turn off the photo layer by clicking the checkmark on the right side of the layer so you can see what you have really created
-you can make layers of solid color behind layers of texture
-layers can be used to adjust the look of colors like an underpainting
4. Blending
-you can use the tool that looks like a finger to smudge or blend colors
5. Brushes
-there are a variety of brushes in different categories for different textures and patterns
-you can use brushes to achieve realistic textures that match your picture or you can use them to create a more illustrated style
-brushes can be created for special effects
-to create a brush hit the plus sign at the top of the brushes panel
-import a photo that has the texture you want as the "grain source" and select a brush shape
-adjust the settings on the brush you created (or any brush by tapping on it twice) to get the look you want
6. Background
-make a layer behind the others you have painted and work on the background
-it can match your photo, just be colors and textures, or whatever style you want
-hide the photo to check and if it looks good, delete the photo layer by sliding right and hitting delete
7. Share/Export
-decide if you want to keep your sketch layer visible or not then you are done!
-go back to gallery
-select your image and hit the share button
-choose the file type you need to export as- jpeg works fine
-save image to camera roll, email, etc.
-we turn in through email or classroom once the image is added to photos


After students felt comfortable with a photo as a guide they got more creative, using a photo as a guide for one element or just drawing directly on a blank canvas in the app.


The students really enjoyed learning ProCreate. Some utilized it for their tool of choice in themed projects in my intro class and the computer graphics students were required to create one project using the app. Thankfully it was a small class so they just took turns and worked on an alternate project while waiting.
Saturday, July 27, 2019

Artists Innovate

One of the Artist Behavior units we tried out in my advanced class 2nd semester was about artists using nontraditional materials or methods. I called it “Artists Innovate” because though less descriptive it was a lot shorter!

Here is part of the lesson plan:
  1. The students will view and discuss work by relevant artists.
  2. The students will apply paint or ink with non-traditional tools.
  3. The students will explore creating a traditional image with non-traditional materials.
  4. The students will explore creating sculpture with found objects and non-traditional materials.
  5. The students will plan and implement a project that is created with a non-traditional process or materials.

Procedure:
Day 1: Look at Chuck Close’s fingerprint portraits- layering prints to create different values- and discuss. Look at images of Matisse doing gestural drawing using a pole and discuss- why did he use that approach? Next, students will make a picture of a plant from observation either using their fingerprints or a paintbrush on a stick.
Day 2: Continue plant pictures, try the opposite of fingerprints or paintbrush on a stick.
Day 3: Look collage/fiber artists Mickalene Thomas, Bryan Grove, etc. Students make small traditional image with nontraditional media.
Day 4: Look at found object/assemblage artists. Explore available materials and play/experiment.
Day 5: Come up with a proposal and present to teacher. Work on project!
Days 6-20: Work on assignments.
Here are two examples of the traditional subject, nontraditional approach exercise. Plants made with a paintbrush on a stick and with fingerprints.
This student turned a broken hair dryer into a drawing machine. He melted crayons on the blades and figured out how to still make the fan run with a little help from our technology teacher.

This student wanted to make jewelry out of found objects. She started with forks and ended up exploring nontraditional jewelry the whole time.

She got scraps of glass from our local hot glass shop and fused them before making a wire wrapped necklace inspired by Alexander Calder.
This student used fabric scraps to create an abstracted kite piece.


This was the unit where I saw the most exploration from my students. Some didn’t have a finished product and others had multiple. Since I grade mostly based on the Artistic Thinking Process that worked out just fine!

Monday, July 22, 2019

Story

I wanted to share some of the artwork my intro high school students created during our "Story" themed unit this year. You can see another post about this theme along with a slides presentation full of examples here: https://www.katiemorrisart.com/2017/11/story.html.
A couple students took on the challenge of altered books. This was a play on Rapunzel with the artist's friend serving as model.

The next 2 altered books were inspired by anatomy and by telling stories. The book on the left (in progress at the point of this photo) has a rib cage cover and the inside had sections of pages cut away to represent the organs. The book on the right is supposed to be a campfire where you could sit and tell stories. The student used tissue paper for fire and ash.


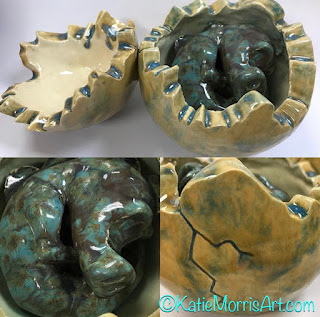
The next project was created by a student who loves fantasy and dragons. She made a hollow egg first and cut it apart so that it fit perfectly together. Then she sculpted a tiny baby dragon. She experimented with layered glazes and found a combination she liked.
The following project was made by a student who wanted to explore spray painting. He created a combination of stencils and masks that he used to make a phoenix.
This student used a mask mold as a starting point for a mermaid. She added some real shells in the end.
It's always fun to see the variety. I only wish I'd taken more photos!

Thursday, July 18, 2019

7th Grade Art

I'll admit it. Middle school is the grade level I struggle with the most when trying to figure out how to run my choice-based classroom. It is likely because the makeup of my classes vary wildly from year to year. Some years I have all the students who aren't enrolled in music, and other years it is opposite band. Some students actively choose are over a music class but most are in there by default. The size of the classes in the last four years have ranged from 6-19 students. Each semester I end up waiting to see the makeup of the class and then responding to it, offering the level of choice that I feel the students are ready for and typically giving less direction as the semester progresses.
This year I had a fantastic 7th grade class. There were only 9 students in the class and they were pretty artistically motivated. I was able to give more freedom earlier on than usual. We had a loose pattern of an assignment that started with an open-ended prompt followed by time to work on independent projects. Some students kept coming back to their independent projects throughout the semester and others would complete multiple projects while their classmates finished up their assignments. I saw a lot of collaboration from working together on constructing sculptures to sharing ideas and inspiring each other.

I am looking forward to seeing what these students create as 8th graders!

We went through a lot of cardboard!
This flower was gifted to the kitchen workers and brightened up the lunchroom for the rest of the school year.
A couple of students even explored digital paintings using photoshop and a graphics tablet on the left and procreate on the right.

Friday, July 12, 2019

2019 State Fish Art Contest

I've written about the State Fish Art Contest before (see posts here) because I feel like it, along with the Jr Duck Stamp, are great programs that merge art and science. It's always a choice for my students to complete the art and an additional choice on if they want to enter the contest or not. This year I only had 3 students choose to enter... and 2 were my own children! My kids worked on their projects over spring break and it was a good distraction from screens since spring break in Kansas is usually too cold to do much outside.
My oldest son chose the Colorado state fish- the greenback cutthroat trout. He had watched me using watercolors a few months before so he was excited to try out some techniques. He drew the fish and used masking fluid to trace the outline. He used a wet on wet technique to paint the water, letting drops of color fall on the wet paper and then sprinkled coarse sea salt and some table salt on the wet paint to create a pretty cool effect.
When the background was dry, he painted the body of the fish and later used colored pencils to add details.
Showing off his finished painting
My middle son used a wax resist technique, adding watercolor over his crayon drawing of a channel catfish.
Some states have a lot more participation in this program than others. It is not well known in Kansas but it is a worthwhile program, especially if you have students or children of your own interested in wildlife, conservation, or environmental science.

Sunday, July 7, 2019

Practicing What I Preach: Oil Painted Portraits

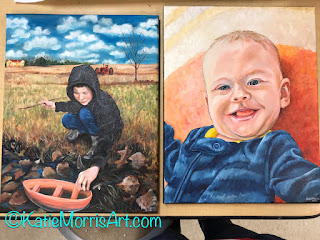
I think it is important to practice what you preach, so I try really hard to make time to make my own artwork. That has looked different in the past year with the addition of my 3rd baby but I feel so much better and more like myself if I do something creative, even if it's only 10 minutes at a time, and I think it is good for students to see me working on my own art. During the spring semester I managed to make 2 11x14 oil paintings of my oldest and youngest sons. I finally found got the right reference photo for my middle son so hopefully I will get that painted by the end of the year. 
Both paintings were made in my classroom. I started the first painting you see here because a student wanted to oil paint a portrait so I decided that would be a great time to start one of my own to demonstrate. I worked on it sitting next to that student and a few minutes here and there when all the other students were working independently. I just found a strategic location where I could see everyone and it worked out great! I also spent a couple of lunch sessions painting after I finished eating and stayed after school to work on it while my older boys played on the play
I like taking progress photos while I work. It helps me to reflect on my process.
I took the painting to Highland Art Day where I added it to the teacher display. While walking around checking out all the artwork I overheard another art teacher making disparaging comments about teachers who have time to make their own artwork. How they (we) must not have big classes and can't possibly have children of our own... I was nearby wearing my youngest in a moby wrap at the time! I was pretty frustrated at the time at the rude comments and chose to go get a snack instead of confronting the other teacher. I may not have classes as large as some art teachers but I work just as hard and trust me, small schools have their own issues. No situation is perfect but I wish we could build each other up instead of putting down others who we perceive to have it easier. 
The two paintings side by side
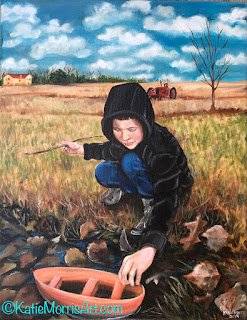
The next painting showed more of the figure. It fits the personality of my oldest who loves to build and explore, and is not super comfortable smiling at a camera!
This painting was more of a challenge for me. I wanted to use the same style as the first portrait but I had so much more information in my reference photo. I eventually accepted that they were going to have different styles but as long as each represents the subject well, I'm ok with that.
More progress photos
Finished painting
How do you make time for your art? Do you ever work alongside your students?