Showing posts with label advanced art. Show all posts

Thursday, December 31, 2020

Symbolic Fused Glass

This is a lesson plan I developed after hearing Preston Singletary speak at the 2019 KAEA Fall Conference.  I think it’s important to remember thy we can be inspired by artist’s big ideas without trying to imitate the look of their artwork. (Full lesson plan at the end of this post!)

First we go through the slides presentation and use that to discuss Singletary’s artwork and big ideas. There is a nice video segment that shows his process and let’s him explain his goals. 


At the end, students are asked to reflect on their lives and what symbols could be used to represent their identity and their story. 

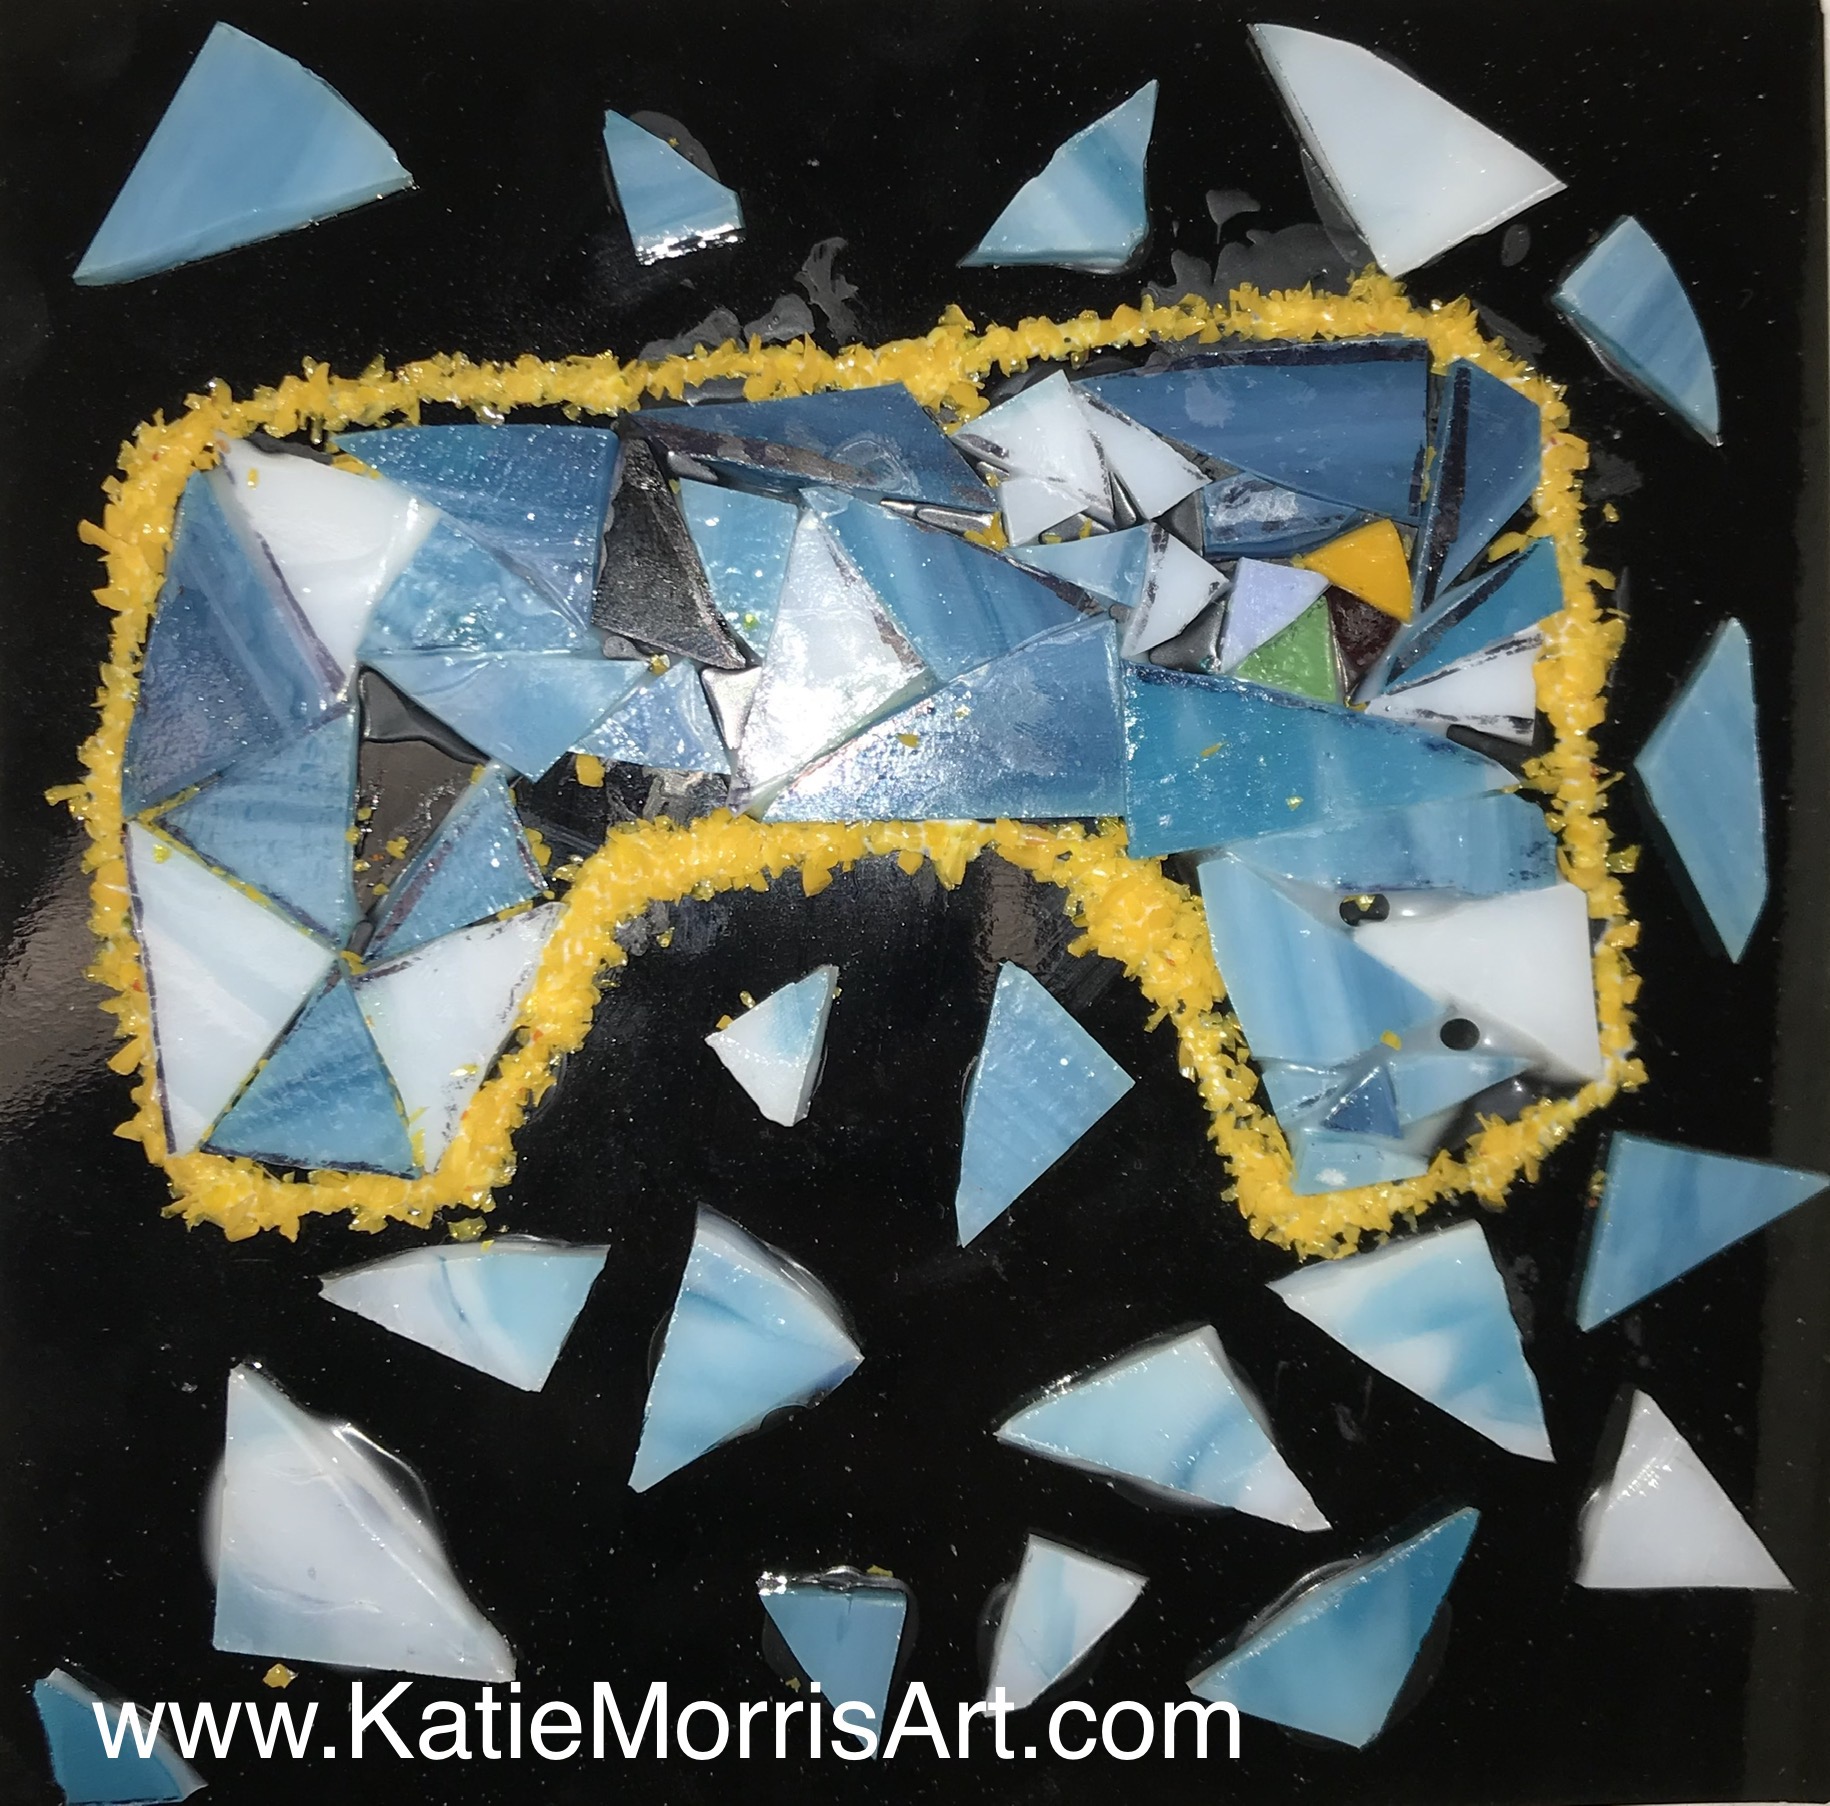
After choosing a symbol they work to simplify it into shapes that could be cut from glass. We have access to glass for fusing so that became the medium for the project. Students learned to cut and grind glass to prepare their work. We used Elmer’s glue or Aloe Vera gel to hold pieces in place until they were fired. 

The plan was to let students cover the edges in copper foil and solder chain to the top so they could hang in a window but we were having issues with the soldering iron and Covid happened before I could order a new one! Thankfully we have a new soldering iron now so we should be good to go if we do this again!
Video game controller design made from glassHorse shoe design made of glass

Speed boat design made of glass

Ice cream cone design made of glass
Glass layouts loaded in the kiln
Finished fused glass tiles

Katie Morris

Jackson Heights High School


Advanced Art


Lesson Title: Symbolic Fused Glass


Rationale: This lesson is intended to introduce students to glass artist Preston Singletary and the idea of using symbolism to tell stories.


Objectives

  1. The students will participate in an inquiry based discussion of glass artist, Preston Singletary’s work.

  2. The students will describe how Singletary used symbolism to tell stories.

  3. The students will reflect on their own lives and make a list of stories that are important to their identities.

  4. The students will brainstorm possible symbols to represent their identities and personal stories.

  5. The students will work to simplify and abstract images into geometric shapes.

  6. The students will demonstrate good craftsmanship and safe use of tools and materials when working with fused glass.

  7. The students will design and create a fused glass design that incorporates personal symbols to tell a story.

  8. The students will consider possibilities and make artistic choices about the function and method of display for their glass piece.

  9. The students will reflect on and explain their work in a written artist statement.


Resources

Slides presentation about Preston Singletary

Fused glass book

PBS Craft in America: Nature (Trimmed: https://youtu.be/HG1mgw6cIgA?start=2016&end=2725 )

Tools and Materials

Paper and pencils

Fused glass

Glass cutting tools

Elmer’s glue and Aloe Vera gel (to hold glass in place)

Kiln

Shelf liner paper


Artist Bio

Seattle-based Preston Singletary (bass and founder of Khu.éex’) is a visual artist, glass sculptor, and teacher who renders traditional Tlingit forms in the non-traditional medium of glass. He has worked globally with Indigenous art communities and artists.

Recognized internationally as one of the leading glass artists of his generation, Singletary has artworks in dozens of museum collections. In 2004 he had a solo exhibition at the Seattle Art Museum. Singletary maintains an active schedule by teaching and lecturing internationally, including an Artist Series lecture at the NAEA 2018 convention. PBS featured his work in the 2017 Craft in America NATURE episode.


Procedure

Day 1: The teacher will lead the students in an inquiry based discussion about Preston Singletary’s work, starting with an image of his artwork and asking the students questions about what they see and think. The students will try to “read” the symbols to see if they can figure out any of the stories before watching a video of Singletary talking about his work and telling the stories of his people. Next, the teacher will ask the students to follow the design process to develop symbols that tell their personal stories/represent their identities which will be used in a fused glass project.


Symbol Design Process

  • Reflect on your life and make a list of stories that are important to your identity

  • Brainstorm possible symbols to represent your identity and personal stories

  • Sketch pictures of the symbols

  • Narrow down your symbols to the top 1-3

  • Simplify your symbols into geometric shapes


Day 2: The teacher will explain and demonstrate the fused glass process.

  • Start with a solid colored piece of glass as the base

  • Use scrap pieces and the glass cutting tools to create the shapes needed to represent your symbol(s)

  • Layer the glass pieces up to 3 thick

  • When satisfied, glue in place with Elmer’s glue or Aloe Vera

  • Frit (small pieces) can be used to add details

  • The glass will be heated in the kiln on top of shelf liner to a point that all the pieces are fused into one piece

  • After the initial fusing, the piece can be fired again to slump it into a mold, or it can stay flat

The students will finalize their design plans and begin to prepare their glass pieces.


Day 3: The students will finish their fused glass preparations and the teacher will load in the kiln.


Day 4 (after first firing): The students will prepare the work for slumping if desired.


Day 5: The students will reflect on and explain their work in a written artist statement which will be displayed with their work.


Student Examples


Standards


VA:Cr2.1.HSIII


I can experiment, plan, and carry out an exploration of a personally meaningful theme, idea, or concept.

I can explore a personally meaningful theme, idea, or concept through multiple works of art.

I can experiment with different media and techniques in the planning phase of art-making.


VA:Cr3.1.HSIII


I can work back into a completed work of art to revise or refine to meet criteria.

I can examine, reflect on, and plan revisions for works of art and design in progress by applying relevant criteria and personal artistic vision.


VA:Re7.1.HSIII


I can analyze how reactions to art change over time with new knowledge and/or experiences.


VA:Re8.1.HSIII

I can analyze different interpretations of an artwork and choose one to defend.


VA:Cn10.1.HSIII


I can make meaningful works of art by using my knowledge of social, cultural, historical, and personal life.

Sunday, June 14, 2020

Advanced Students Art From Home

My advanced students were given prompts for the first few weeks before moving to choice boards. Here are some of their pieces!

Make art with what you can find at home
Food art inspired by Jessie Bearden

Make art showing how you feel about your social distancing experience
The points on the map represent feeling distanced from her friends.

Make art about a personally meaningful theme or idea

Thursday, August 8, 2019

Fused Glass

We have supplies for glass fusing but haven't used them all that much in the past as it is just pretty expensive. At the end of the school year my seniors went to a workshop at League Art and then came back ready to apply what they'd learned and try some new things.

This student went for an animal eye fusing small pieces of glass onto a blank sheet.

This student fused glass together, used scraps she found, and create an abstract face that we mounted to a board.

After this student fused glass into a gold fish design, we tried slumping it. She made a shallow bowl and we brushed on mold release before putting her fused sheet on top. I have now officially gotten over my anxiety about programming the kiln!

I ordered a bit more glass for the new school year to make up for colors we didn't have so I look forward to offering the option to my advanced class.

Saturday, July 27, 2019

Artists Innovate

One of the Artist Behavior units we tried out in my advanced class 2nd semester was about artists using nontraditional materials or methods. I called it “Artists Innovate” because though less descriptive it was a lot shorter!

Here is part of the lesson plan:
  1. The students will view and discuss work by relevant artists.
  2. The students will apply paint or ink with non-traditional tools.
  3. The students will explore creating a traditional image with non-traditional materials.
  4. The students will explore creating sculpture with found objects and non-traditional materials.
  5. The students will plan and implement a project that is created with a non-traditional process or materials.

Procedure:
Day 1: Look at Chuck Close’s fingerprint portraits- layering prints to create different values- and discuss. Look at images of Matisse doing gestural drawing using a pole and discuss- why did he use that approach? Next, students will make a picture of a plant from observation either using their fingerprints or a paintbrush on a stick.
Day 2: Continue plant pictures, try the opposite of fingerprints or paintbrush on a stick.
Day 3: Look collage/fiber artists Mickalene Thomas, Bryan Grove, etc. Students make small traditional image with nontraditional media.
Day 4: Look at found object/assemblage artists. Explore available materials and play/experiment.
Day 5: Come up with a proposal and present to teacher. Work on project!
Days 6-20: Work on assignments.
Here are two examples of the traditional subject, nontraditional approach exercise. Plants made with a paintbrush on a stick and with fingerprints.
This student turned a broken hair dryer into a drawing machine. He melted crayons on the blades and figured out how to still make the fan run with a little help from our technology teacher.

This student wanted to make jewelry out of found objects. She started with forks and ended up exploring nontraditional jewelry the whole time.

She got scraps of glass from our local hot glass shop and fused them before making a wire wrapped necklace inspired by Alexander Calder.
This student used fabric scraps to create an abstracted kite piece.


This was the unit where I saw the most exploration from my students. Some didn’t have a finished product and others had multiple. Since I grade mostly based on the Artistic Thinking Process that worked out just fine!

Friday, January 1, 2016

Fear

Fear of being alone.
Fear of heights and fear of clowns.

My last blog post was about a theme I used in my advanced art class as we transition to TAB. (Click here to read about Opposites). After "Opposites", we moved on to "Fear". The idea was supposed to be "facing your fears through art" but due to unfortunate timing (I introduced this in early October and Halloween was not even on my radar), a lot of students initially took it as "make something to creep people out". I felt like a couple projects were going in a direction that was veering toward inappropriate for school so we had to have a talk and a student said she wasn't afraid of anything. I said that everyone is afraid of SOMETHING if you're brave enough to be introspective and reminded that they don't have to be physical fears like my fear of spiders. I understand that it's hard for some teenagers to be vulnerable in their artwork, so I think that I should have sat on this theme until later in the year. I'm pretty happy with most of the students' efforts in the end.
The only good thing about my weird timing with this project, is that another TAB teacher, Mrs.Rose, just happened to be introducing the same theme to some of her students. Maybe it was even on the same day. Anyway, we were discussing it in the High School TAB Facebook group and decided to have our classes Skype about the project. I think the students were a little slow to warm up to each other but by the end they were planning to find each other on snapchat. I think it was a good experience for them to "meet" and I'd recommend other classes trying it out in the future.

To help the students see how they could FACE their fears, I decided to walk the walk and face my own fear. I think that was kind of a turning point for a few students who became very encouraging. My next post will be about my fear painting.

I really need to start taking pictures with my good camera again instead of relying on my phone. The skull represents fear of death. The skull was painted with acrylic and to make the "dirt" around the skull, we mixed brown paint, mod podge, and sand. It has awesome texture and depth to it in real life.
This project represents fear of not reaching his goals. This student thinks about every little element that goes into his work.
This painting is about the fear of being normal. Half of her face is "normal" and the other half has been changed.
The two works above were students who pursued others' fears instead of their own.
I have one student in my advanced class that is a real natural at illustrations and digital art. I've been encouraging her to keep exploring and learning new skills in Photoshop. She wanted to represent the fear of drowning in her artwork. She started by scanning her drawing and painting it. I'd already shown her how to dodge and burn to add highlights and shadows but she found a youtube tutorial to help with the water effect. Here is her reflection on the project for the students' final:
My "Fear" project is my most successful because it's the only project I've done that means something to me. I'm a great swimmer, actually; but there's something about the water that will always scare me. I only have this irrational fear towards ponds and lakes because I don't know what's at the bottom, I have to be able to see where it ends. This is why I am afraid - as much as I hate that word - of water:Before you can even begin to process what’s happening, you flail and you toss; there’s no upside down or right side up. At that point it’s hard to even think anything besides “help” or “please.” There is no begging to fear because it’s not real, it’s the product of thoughts you create. Danger is very real, and there’s nothing you can to save yourself at that point.In the movies drowning is loud and splashy; the orchestra subdues the crashing of waves so the ambience is dramatic. That’s how entertainment makes it look. In reality the only sound you can hear is the ringing of your ears as water engulfs you and you start to lose consciousness. Drowning is quiet, your moves are subtle. The moment that the breath you held runs out, your head starts to pounding as your body screams for oxygen. It feels like your head is about to explode until you finally take your last, involuntary breath. Water fills your lungs and there is no more time to think or react. Your mind stops. I look at that project and see the tremendous amount of effort I put into it and how well it turned out. The colors, texture, and shadow turned out great. Regardless of me using a tutorial, I actually didn't follow as much as I thought considering color, style, and texture. Some people say that "computer art isn't real art," and I think that's a load of bologna. I had to draw out the girl in the image before I did anything else, after that I did do the rest on the computer. I'm actually really proud of this one and have yet to find a problem with it unlike my other digital-art projects.