Sunday, February 28, 2010

Youth Art Month

I am a board member of Kansas Art Education Association so I got to spend most of my Saturday at the State Capital Building helping set up for and photographing our Youth Art Month celebration.  There has been quite a lot of renovating going on in the building so we were only able to have the student artwork up for a day.  We hung artwork from 8-10, had a board meeting from 10-2, and while the reception was scheduled to start at 2:00, I started hearing families in the lobby as early as 12:30!  It really was a great day.
Photos of the building
Creation Station for the kiddos to make creative name tags
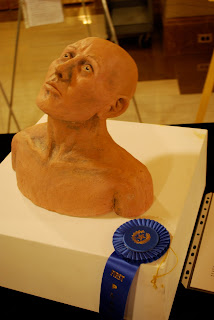
Some of the Senior Scholarship entries
For the fist time ever, both of our Senior scholarships went to three dimensional pieces.

Bob Cross, KAEA President Elect giving the welcome speech

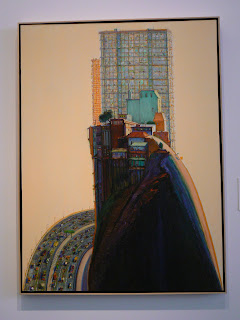
Apartment Hill Drawings

Wayne Thiebaud's "Apartment Hill" painting from 1980 was the inspiration for this lesson.  I am a big Thiebaud fan- love those colors.  I first saw this painting when visiting the Nelson-Atkins Museum of Art in Kansas City to check out their new Bloch Building (<--- Awesome.)

To introduce my students to Thiebaud, we looked at Susan Goldman Rubin's book "Counting with Wayne Thiebaud".  (Susan Goldman Rubin has a bunch of cool primary level art books.)  Couting with Wayne Thiebaud is a board book with artwork to correspond with the numbers 1-10.  The text is minimal and I told the 2nd graders that it is geared toward Pre-K students but would work well to show us 11 different of Thiebaud's works of art.  All of the artwork is food themed which led to many exclamations of hunger from my students who have Art class right before lunch!

The students described, analyzed, interpreted, and judged Apartment Hill.  We focused a lot of the discussion on the shapes.  Next, I introduced the assignment to the students.  After the discussion on day 1, the students drew buildings on black construction paper and traced the drawing in glue.  I stressed to the students not to lift the tip of the glue bottle from the paper but I think some got a little carried away when I wasn't looking!  The glue-y papers went onto the drying rack and were ready for color when the students returned to art the following week.

This was the first time I had ever tried glue drawings.  I think it would probably be easier with a little older students!  I had the first class use pastels to add color but switched to construction paper crayons with my second class and all the remaining classes.  I love the brightness of the pastels but was not anticipating how messy it would be with younger students!  Next year I am going to ask for donated paint shirts... I don't plan on using pastels again until I have some sort of barrier between the pastels and the students' clothes.  One girl actually leaned over her drawing to reach for something and came up with a monoprint across the front of her shirt!  Anyway, the construction paper crayons worked great and I was really pleased with the results. 

I invite you to check out our Artsonia exhibit and to view the artwork below!

^This is one of the pastel drawings.


Thursday, February 25, 2010

"There are two artists that I really like..."

So last week I started introducing our mural project to my 4th-6th grade students.  I showed them some murals from Art History, especially murals from Kansas, and murals that I have painted.
The Artists included:
John Steuart Curry (painted mural of John Brown in the Kansas State Capital Building)
Thomas Hart Benton
Diego Rivera
Joan Miro (ceramic mural at the Ulrich Art Museum, Wichita State University)

I showed the classes a series of murals I painted in the children's wing of a local church.  It was obviously inspired by Vincent van Gogh (I explained that I used his idea of swirls and mixing colors but did not "copy" him)

We had a couple extra minutes in line at the end of class so we did a survey.  I reviewed the list of murals from Art History that we saw and asked the students to name their favorite.  Anyway, the reason I had to make this quick post is that one of the 4th grade students, being totally sincere, told me: 
Mrs.Morris, there are two artists that I really like: Vincent van Gogh and you.
It was sweet and cracked me up at the same time.  He was only sucking up a little bit, right? :)

Sunday, February 21, 2010

Old Black Fly Drawings

I have a bunch of books in my classroom.  Most of the Art books I have purchased are kept safe at home but I have quite a few for the students to read if they finish their art projects early.  Some of the books were given to me by a new classroom teacher- she had her own classroom library and the old teacher left them behind and some I picked up when the library was retiring them.  My classroom books are either about artists or just have awesome illustrations.  One of the books I picked up with really cool illustrations is "Old Black Fly" by Jim Aylesworth with pictures by Stephen Gammell.  It was kind of an accident that I ended up doing a lesson on Old Black Fly.  I see my K-3 students once a week on Monday, Tuesday, and Friday.  We missed a couple Mondays and Fridays because of snow, holidays, and parent teacher conferences so I had forgotten that my Tuesday classes were a week ahead of the others.  I remembered about half an hour before my 2nd grade classes came in that they were already finished with their previous assignment so I went to my book case to find a new project.  The photo above shows the book cover and my example of the follow the leader drawing.


First, I read the book to the students.  Old Black Fly is about, well, an Old Black Fly.  The book goes through the alphabet and tells the story of all the things that Old Black Fly was up to.  The story has great rhythm and repeats the phrase "Shoo Fly!  Shoo Fly! Shooo!"

I used to not be a fan of "I draw, you draw" or "Follow the Leader" drawings but now I can see the value and think they are great, like everything else, when used in moderation.  Follow the leader drawings are a great way to give direct instruction and model the thought process we use to make drawings.  I think it was beneficial for my students to see me mentally break down my reference image into shapes, and after the drawing was laid out, to see how I blended colors.  We used gray construction paper (I had a ton donated, very exciting!) and construction paper crayons.  We did use a regular red crayon to do the outermost ring on the eyes and later a black crayon to trace around the eyes.  I stuck my paper on the chalkboard and laid out the drawing in sharpie to make it easier for the students to see.

Here are two student examples:

One of the students (artwork not pictured) started to get upset and said that he "messed up" his drawing.  I told him that we were going for the illustrator's style and it was impossible to have messed up!


There was a little extra time with this class so they used crayons to add scribbles like the splatters in the book.

Monochromatic Silhouettes


I posted about my 6th grade Monochromatic Silhouette lesson before but now I've finally gotten ALL of the artwork photographed and on to Artsonia.  I got the artwork hung in the hallway in time for parent teacher conferences.  I hung the artwork in two groups and I actually feel a lot better about the results of the project when I saw them all together.  I limited the students' paper choices to orange, blue, green, or purple to make the painting process easier.

Check out the action painting 4th from the left on the 2nd row from the top!


Check out this exhibit on Artsonia!

Wednesday, February 17, 2010

Resourcefulness

I saw this today.  "Resourcefulness" is definitely a word that characterizes Art teachers!

Do I want some coffee cans?  Sure!
Can I use old calendars?  Definitely.

I had enough money in my budget for supplies this year, but I know it's going to get worse.  That's why I am stocking up and trying to think of as many projects as I can that use donated or recycled materials.

I now have quite the stash of cardboard tubes, old CD's, and 1980's computer paper.  I am planning to use the tubes for cardboard sculptures with my 4-6 students next fall and make Totem poles sometime this spring.  I haven't decided what to use the CD's for, there are so many possibilities!  I love to get boxes of old computer paper.  The paper is great for free draw if a student finishes early.  (Free because the student can draw whatever s/he wants and free because it doesn't affect my budget!)

To get materials, I sent out an email to the staff, put a note in the newsletter that goes home to parents, and posted a list of desired supplies on my classroom page.  I am always finding toilet paper tubes, etc. in my mailbox or on my desk and have teachers and parents asking me if I can use whatever it is that they have.  I don't think I have turned anything down!  I also asked the custodians at my school to save paper towel rolls for me.  When the paper towels get close to the end of the roll, a new roll is switched out.  I will put partial rolls at tables when we are painting and then save the tubes.

I know that others are interested in recycled projects and I think it would be WONDERFUL if we could compile a list of ideas!  If you have an idea for a great recycled project or some other free/recycled materials that you have found a use for, please share it!

Saturday, February 13, 2010

Happy Valentine's Day!

You are the nicest Teacher
You're good and kind and true
Long after one has
left your class
They will remember you!

Kindergarten- Home and Family Paintings

Today is Grant Wood's birthday and his painting, American Gothic from 1930 was the inspiration for this lesson.
American Gothic. [Online image] Available http://www.artic.edu/artaccess/AA_Modern/pages/MOD_5.shtml#

Day 1: I asked the students to raise their hands if they have ever seen the painting before.  Next, I called on students to describe the painting (at this level, name things they see in the picture.)  I ask the students who they think the people are and what their relationship is.  (Do you think they are friends or family?  Husband/wife, brother/sister, father/daughter?)  After the students have shared their ideas, I told them about Grant Wood and the painting.

Background info on the painting: Grant Wood was born in Iowa in 1891.  Wood grew up on his family’s farm where his interest in art developed.  Wood began selling paintings in high school to make money for art supplies and attended the Handicraft Guild art school in Minneapolis and the Art Institute of Chicago after graduating.  He joined the army as a camouflage painter and afterwards traveled to Europe to study art.  Grant Wood said “I realized that all the really good ideas I’d ever had came to me while I was milking a cow.  So I went back to Iowa.”  Returning to Iowa was very important in Wood’s career.  He decided to paint the landscapes and the people he was most familiar with.  This made Wood part of a movement known as Regionalism that some consider the first uniquely American art style. The story behind the painting is that Wood was traveling through Eldon, Iowa when he saw a farmhouse with an unusual window.  He had a photograph made of the house so that he could work on the painting in his studio.  Wood’s sister, Nan, and his dentist posed for the painting as a farmer and his daughter.

I wanted this project to be about home and family instead of parodies.  Basically, the painting is a picture of a family in front of their home!  After the Art History lesson, ask students the "big questions":
-What is a family? (Ask what IS instead of what MAKES unless you want to hear about having babies...)  Are all families the same?  Art pets part of the family?
            -What makes a house a home?  What are some different kinds of homes?

Then I told the students that their assignment would be to make a picture of their family in front of their home.  At this stage, I gave the students 9x12 inch white paper and pencils.  I reminded the students not to color anything in with pencil because we would be painting in the next class.

Day 2: Pass out drawings, go over paint brush care, painting procedures, roll up sleeves and remind the students to be VERY careful!  (I need to acquire some paint shirts!)  I wanted to show the Young Sloppy Brush video but I can't seem to find it online ANYWHERE.  It must have been taken off of all the websites for some reason.  I used tempera cakes and gave the students the smallest paint brushes I had in the classroom to encourage detail work and to make sure they took longer than 2 minutes to paint.  Most of the students used the entire class period to paint.  A few finished early and were given free draw paper.  I have back to back classes and obviously that doesn't leave any time to switch out supplies in between.  When my second class came in, I had them sit on the line made from red duct tape (the farmer's almanac told me that either "duct" or "duck" is correct!) where they line up at the end of class while I switched out water and reviewed the Art History lesson from Day 1.

Day 3: I showed the students how to use a marker (either sharpie or black felt tip pen) to trace back over their initial drawn lines and bring out the details of the picture.  Markers were the finishing touch and it worked really well for students who missed the class we painted.  I didn't think it would work to get out paint just for a student or two who had been absent so I had them trace their pencil lines and use crayon to color in their pictures.

Here are some of my student examples.  We all really enjoyed this project, and I'm guessing that their families will appreciate the results!


(One of my Pre-K students that comes with Kindergarten to art.)

Thursday, February 11, 2010

National Arts Education Public Awareness Campaign

You should totally check out the National Arts Education Public Awareness Campaign!

I looked up the website after finding an ad for "Van Goghgurt" in my SchoolArts magazine.  Here are some of the ads: