Showing posts sorted by relevance for query Advanced art. Sort by date Show all posts

Sunday, October 15, 2017

Sub Plan Ideas for High School Art

I'm preparing to attend the Kansas Art Education Association fall conference later this week, and though it falls on Parent Teacher conferences for me this year, most of the time art teachers are thinking about sub plans.

Most of the time I just try to make sure my intro classes have their new "projects" going (independent exploration after a boot camp or a themed challenge) and my advanced students are almost always working on their own projects so that I can just write "the students are working on their own projects and should know what to do" and leave notes on any behavioral FYIs.

Some of the techniques I've used in the past to hold students accountable for their work in my absence are a short survey on Google Forms or a post-it note the students fill out with their name, what they worked on, and a score of 1-10 with how engaged (on-task) they were that day.

Google Form example:
Name:
Hour:
Tell me specifically what you accomplished today:
How focused were you
   Super focused- I got a lot accomplished and was on task the whole time.
   Mostly focused- I got stuff done but spent some extra time talking.
   Not that focused- I made some progress but spent more time talking or off task than I should have.
   Not focused at all- I hardly got anything done and was off task most of the time.

Sometimes, you may need a sub plan that is different than what the students regularly work on. After some of my art teacher friends and I brainstormed a list of sub plan ideas for high school, I figured I would share them here!

  • Art Prof Art Dare- Each month the Art Prof (Clara Lieu and her partners) post a challenge, which is pretty interesting, and the older ones are archived as well. My students especially enjoyed the drawing challenge from February 2017 that had charts with interesting words for the artist to illustrate. I later made my own with different words to use with my middle school students.
  • PBS Art Assignment- PBS digital studios produce some great content, such as the Art Assignment. Art Assignments introduce a contemporary artist, make connections to art history, and then challenge students to apply some of the ideas. Explore their channel!  

  • Scholastic Art- Have the students read one or more of the articles and complete the worksheets in the teacher resources. Or, ask the students to make a work of art in response to the featured artist/movement or the student spotlights.
  • Inktober- Find a seasonal art challenge. In October, lots of people participate in "Inktober". I need to start! I've seen several more pop up at different times of the year.
  • Illustration Friday- Each week there is a new topic in the weekly art challenge. You can see how artists/illustrators have used different styles and mediums to complete the task. Your students can take on the challenge, too!
  • Artprompts.org- Click on a category such as character, creature, environment, object, situation, or challenge and get a random selection from a huge database. Don't like it? Keep refreshing until you get something that resonates with you. You can even submit your own ideas. Students can use their prompt as a starting point for a sketch or finished work.
  • Art 21- "Art21 is a nonprofit organization dedicated to inspiring a more creative world through the works and words of contemporary artists." Have the sub show a video and then students could write a response, do visual journaling, answer some questions, or whatever you decide!
What easy ideas do you use for secondary art subs?

Saturday, March 18, 2017

Community and TAB-ish art history

Last summer as part of my graduate coursework, I took a class that was a survey of art history for educators. I LOVE art history, I minored in it at ESU, but I was a little nervous not knowing if we'd be expected to create lesson plans "in the style of" the artists we were learning about. Thankfully throughout my courses at UNK, I found that they had a real interest in letting the students make the program work for their lives- their teaching style, grade level, community, etc.


Throughout the course I tried to develop resources that I would actually use. I figured out how to incorporate art history into my TAB-ish classroom.


Our school mascot is a cobra. 
One unit that inspired an idea was American Regionalism. I always try to boil art history down into the big idea. Regionalist artists were basically painting pictures that represented the people, places, and stories of their communities. Today's communities, even in the midwest where Regionalism was rooted, look much different than in Grant Wood's, Thomas Hart Benton's, and John Steuart Curry's day. Technology and social media have changed how we connect. I wondered how my students would define their communities.


I've been using a mixture of boot camps and themes for my main high school art class. On the day we were due for a new theme, I started off with a slides presentation about Regionalism.


We discussed the slides, discussed the idea of community and how it doesn't have to be a physical community, before brainstorming communities that the students are a part of and figuring out how they wanted to represent the idea of community in a work of art. Some students chose our school as a community, several represented teams or organizations, some used farming or hunting, some chose online communities, some even represented serving the community in the military. The ideas were vast and so were the media the students chose to carry out their ideas.

This student made a rural scene which fits our community but filled in the space with binary code to represent himself.

Two designs with the same composition and colors (our school colors) reversed were woven together to represent our school having a lot of different types of people but we're all one community. Made by a student with some special needs.

Our school has very successful running programs and the students talk about the feel of family and community there. I wish I'd planned for more time on this project. The painting of the team on the top right would have been much improved if the student wasn't rushed to finish before the end of the semester.

Godspell was our school musical last fall so it made an appearance in a couple projects.
This student works at a veterinary office as a kennel tech and represented her job as part of her community.

This was supposed to be a church picnic but the student ran out of time and had to eliminate more of the crowd. 

Representation of the style and sense of humor of this students' community of friends.

Artist Statement: I decided to represent the farming community through the burning of CRP/Grassland. I choose this topic because I grew up in a farming community. Also, I have had experience in burning CRP. In my art I painted the grass being burned, sparks flew through the air and into the fire, and the fire was fully ablaze. I had trees in the background that were about to be caught on fire. Finally, behind the fire I have the burnt pieces of grass that have already been through the fire.
The two students above used their after school jobs as part of their community project.
Artist Statement: I did, for my community project, a couch with four people people, one a Death Eater (from Harry Potter), one a Science Officer (from Star Trek), one a X-wing Pilot (from Star Wars), and a Superhero (The Flash, from DC comics). I represented the Nerd community by putting these four together. I chose this topic because I am very big in this community. I visually represented this by putting them all hanging out together on a couch, in one of their houses. The title also represents the community by being the thing that starts every Simpsons’ episode ever (Couch Gags).

One of my freshmen loves wheel throwing and is pretty good at it. She has a large family that represents community to her so she made a bowl to represent each member of her family.


I think this theme will be added to my rotation. I teach in a small school so my class "regular" art class is like an Art 1, but students can take it more than once so I may have a senior with 4 years of art under their belt and a freshman who hasn't had art since elementary school in the same class. I think I will have to figure out a rotation of themes or some other method to allow students to propose their own theme. My advanced art class has been a full-TAB experiment this year. I'm still finding the right balance for my students.

Friday, January 1, 2016

Fear

Fear of being alone.
Fear of heights and fear of clowns.

My last blog post was about a theme I used in my advanced art class as we transition to TAB. (Click here to read about Opposites). After "Opposites", we moved on to "Fear". The idea was supposed to be "facing your fears through art" but due to unfortunate timing (I introduced this in early October and Halloween was not even on my radar), a lot of students initially took it as "make something to creep people out". I felt like a couple projects were going in a direction that was veering toward inappropriate for school so we had to have a talk and a student said she wasn't afraid of anything. I said that everyone is afraid of SOMETHING if you're brave enough to be introspective and reminded that they don't have to be physical fears like my fear of spiders. I understand that it's hard for some teenagers to be vulnerable in their artwork, so I think that I should have sat on this theme until later in the year. I'm pretty happy with most of the students' efforts in the end.
The only good thing about my weird timing with this project, is that another TAB teacher, Mrs.Rose, just happened to be introducing the same theme to some of her students. Maybe it was even on the same day. Anyway, we were discussing it in the High School TAB Facebook group and decided to have our classes Skype about the project. I think the students were a little slow to warm up to each other but by the end they were planning to find each other on snapchat. I think it was a good experience for them to "meet" and I'd recommend other classes trying it out in the future.

To help the students see how they could FACE their fears, I decided to walk the walk and face my own fear. I think that was kind of a turning point for a few students who became very encouraging. My next post will be about my fear painting.

I really need to start taking pictures with my good camera again instead of relying on my phone. The skull represents fear of death. The skull was painted with acrylic and to make the "dirt" around the skull, we mixed brown paint, mod podge, and sand. It has awesome texture and depth to it in real life.
This project represents fear of not reaching his goals. This student thinks about every little element that goes into his work.
This painting is about the fear of being normal. Half of her face is "normal" and the other half has been changed.
The two works above were students who pursued others' fears instead of their own.
I have one student in my advanced class that is a real natural at illustrations and digital art. I've been encouraging her to keep exploring and learning new skills in Photoshop. She wanted to represent the fear of drowning in her artwork. She started by scanning her drawing and painting it. I'd already shown her how to dodge and burn to add highlights and shadows but she found a youtube tutorial to help with the water effect. Here is her reflection on the project for the students' final:
My "Fear" project is my most successful because it's the only project I've done that means something to me. I'm a great swimmer, actually; but there's something about the water that will always scare me. I only have this irrational fear towards ponds and lakes because I don't know what's at the bottom, I have to be able to see where it ends. This is why I am afraid - as much as I hate that word - of water:Before you can even begin to process what’s happening, you flail and you toss; there’s no upside down or right side up. At that point it’s hard to even think anything besides “help” or “please.” There is no begging to fear because it’s not real, it’s the product of thoughts you create. Danger is very real, and there’s nothing you can to save yourself at that point.In the movies drowning is loud and splashy; the orchestra subdues the crashing of waves so the ambience is dramatic. That’s how entertainment makes it look. In reality the only sound you can hear is the ringing of your ears as water engulfs you and you start to lose consciousness. Drowning is quiet, your moves are subtle. The moment that the breath you held runs out, your head starts to pounding as your body screams for oxygen. It feels like your head is about to explode until you finally take your last, involuntary breath. Water fills your lungs and there is no more time to think or react. Your mind stops. I look at that project and see the tremendous amount of effort I put into it and how well it turned out. The colors, texture, and shadow turned out great. Regardless of me using a tutorial, I actually didn't follow as much as I thought considering color, style, and texture. Some people say that "computer art isn't real art," and I think that's a load of bologna. I had to draw out the girl in the image before I did anything else, after that I did do the rest on the computer. I'm actually really proud of this one and have yet to find a problem with it unlike my other digital-art projects.


Thursday, December 31, 2020

Symbolic Fused Glass

This is a lesson plan I developed after hearing Preston Singletary speak at the 2019 KAEA Fall Conference.  I think it’s important to remember thy we can be inspired by artist’s big ideas without trying to imitate the look of their artwork. (Full lesson plan at the end of this post!)

First we go through the slides presentation and use that to discuss Singletary’s artwork and big ideas. There is a nice video segment that shows his process and let’s him explain his goals. 


At the end, students are asked to reflect on their lives and what symbols could be used to represent their identity and their story. 

After choosing a symbol they work to simplify it into shapes that could be cut from glass. We have access to glass for fusing so that became the medium for the project. Students learned to cut and grind glass to prepare their work. We used Elmer’s glue or Aloe Vera gel to hold pieces in place until they were fired. 

The plan was to let students cover the edges in copper foil and solder chain to the top so they could hang in a window but we were having issues with the soldering iron and Covid happened before I could order a new one! Thankfully we have a new soldering iron now so we should be good to go if we do this again!
Video game controller design made from glassHorse shoe design made of glass

Speed boat design made of glass

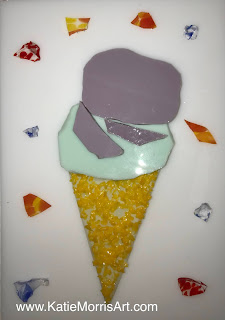
Ice cream cone design made of glass
Glass layouts loaded in the kiln
Finished fused glass tiles

Katie Morris

Jackson Heights High School


Advanced Art


Lesson Title: Symbolic Fused Glass


Rationale: This lesson is intended to introduce students to glass artist Preston Singletary and the idea of using symbolism to tell stories.


Objectives

  1. The students will participate in an inquiry based discussion of glass artist, Preston Singletary’s work.

  2. The students will describe how Singletary used symbolism to tell stories.

  3. The students will reflect on their own lives and make a list of stories that are important to their identities.

  4. The students will brainstorm possible symbols to represent their identities and personal stories.

  5. The students will work to simplify and abstract images into geometric shapes.

  6. The students will demonstrate good craftsmanship and safe use of tools and materials when working with fused glass.

  7. The students will design and create a fused glass design that incorporates personal symbols to tell a story.

  8. The students will consider possibilities and make artistic choices about the function and method of display for their glass piece.

  9. The students will reflect on and explain their work in a written artist statement.


Resources

Slides presentation about Preston Singletary

Fused glass book

PBS Craft in America: Nature (Trimmed: https://youtu.be/HG1mgw6cIgA?start=2016&end=2725 )

Tools and Materials

Paper and pencils

Fused glass

Glass cutting tools

Elmer’s glue and Aloe Vera gel (to hold glass in place)

Kiln

Shelf liner paper


Artist Bio

Seattle-based Preston Singletary (bass and founder of Khu.éex’) is a visual artist, glass sculptor, and teacher who renders traditional Tlingit forms in the non-traditional medium of glass. He has worked globally with Indigenous art communities and artists.

Recognized internationally as one of the leading glass artists of his generation, Singletary has artworks in dozens of museum collections. In 2004 he had a solo exhibition at the Seattle Art Museum. Singletary maintains an active schedule by teaching and lecturing internationally, including an Artist Series lecture at the NAEA 2018 convention. PBS featured his work in the 2017 Craft in America NATURE episode.


Procedure

Day 1: The teacher will lead the students in an inquiry based discussion about Preston Singletary’s work, starting with an image of his artwork and asking the students questions about what they see and think. The students will try to “read” the symbols to see if they can figure out any of the stories before watching a video of Singletary talking about his work and telling the stories of his people. Next, the teacher will ask the students to follow the design process to develop symbols that tell their personal stories/represent their identities which will be used in a fused glass project.


Symbol Design Process

  • Reflect on your life and make a list of stories that are important to your identity

  • Brainstorm possible symbols to represent your identity and personal stories

  • Sketch pictures of the symbols

  • Narrow down your symbols to the top 1-3

  • Simplify your symbols into geometric shapes


Day 2: The teacher will explain and demonstrate the fused glass process.

  • Start with a solid colored piece of glass as the base

  • Use scrap pieces and the glass cutting tools to create the shapes needed to represent your symbol(s)

  • Layer the glass pieces up to 3 thick

  • When satisfied, glue in place with Elmer’s glue or Aloe Vera

  • Frit (small pieces) can be used to add details

  • The glass will be heated in the kiln on top of shelf liner to a point that all the pieces are fused into one piece

  • After the initial fusing, the piece can be fired again to slump it into a mold, or it can stay flat

The students will finalize their design plans and begin to prepare their glass pieces.


Day 3: The students will finish their fused glass preparations and the teacher will load in the kiln.


Day 4 (after first firing): The students will prepare the work for slumping if desired.


Day 5: The students will reflect on and explain their work in a written artist statement which will be displayed with their work.


Student Examples


Standards


VA:Cr2.1.HSIII


I can experiment, plan, and carry out an exploration of a personally meaningful theme, idea, or concept.

I can explore a personally meaningful theme, idea, or concept through multiple works of art.

I can experiment with different media and techniques in the planning phase of art-making.


VA:Cr3.1.HSIII


I can work back into a completed work of art to revise or refine to meet criteria.

I can examine, reflect on, and plan revisions for works of art and design in progress by applying relevant criteria and personal artistic vision.


VA:Re7.1.HSIII


I can analyze how reactions to art change over time with new knowledge and/or experiences.


VA:Re8.1.HSIII

I can analyze different interpretations of an artwork and choose one to defend.


VA:Cn10.1.HSIII


I can make meaningful works of art by using my knowledge of social, cultural, historical, and personal life.

Sunday, December 20, 2015

Opposites

Now that I've made it through my first semester as a PreK-12th grade art teacher, I wanted to write some posts reflecting on what worked well and what didn't. I've been exploring Teaching for Artistic Behavior (TAB) for a few years now but this was my first time to try it out with 7th-12th grade. 5 hours of my day are spent with high school students- 1 hour is advanced art, 1 hour is computer graphics, and 3 hours are "graphic design". My advanced class assignments have been theme based. I think most of the themes are keepers but next time I may introduce them at a different time of year or with a different intro. Part of getting to know my new students and new school environment has been trying to find the fine line between giving them enough of a direction to get started but not so much that they imitate. A lot of students have a bad tendency to find an example online and imitate it with minimal changes (which cued the fair use lesson I'll try to remember to write about later).

One of the first themes I assigned was "Opposites". I gave students a brainstorming sheet to help them get started.

Opposites
We are going to be exploring the idea of “Opposites” for our next project. To begin, brainstorm a list of words and their opposites. The words can be adjectives like heavy and light or they can be more abstract ideas.
1st Word Opposite


Choose one pair and decide how to use it
Pick the opposite pair that is most intriguing to you. Brainstorm ideas on how to use those in an art project. Your project could be 2D or 3D. The choice of media is up to you.

Mrs.Morris’ example
Opposite pair: Heavy and Light
Idea: Make a sculpture of an elephant (something very heavy) out of feathers (something very light) so that the sculpture is almost a contradiction.

My idea Describe your idea with words or thumbnail sketches. Present ideas to Mrs.Morris before beginning. Use the back of the paper if you need more space.

 The first example posted above used the opposite pair of "good and evil" with Little Red Riding Hood imagery.
Fire and Ice- the student used the same profile but flipped so it was like two versions of the same person.
 Young and Old- the student superimposed a photo of her grandparents' wedding onto their mirror using Photoshop.
 Heaven and Hell- fiery background to represent hell and tissue paper angel wings to represent heaven. Another student also did heaven and hell as almost tourist attractions but I somehow missed taking a photo of the painting.
 Chaos and Calm- someone taking a relaxing bath during a zombie apocalypse. There are some little perspective issues here but the idea was interesting.
 Rich and Poor- the student had the idea of constructing a mansion out of trash. There was just a ton of detail put into this project, even windows cut from some sort of packaging plastic.

 Thi sproject was originally going to be Life and Death but it turned into positive and negative or black and white. 

Complementary Colors & Composition- paintbrushes painting opposite colors in opposite directions.

I wish... 

I had found some examples but made those word pairs off limits. I actually didn't SHOW any examples for this project, just talked about ideas because I was fighting the imitation problem. I also wish I'd saved this theme for later in the year because I really like it, I think it has a lot of potential, and it wasn't quite reached. I'm not unhappy with the students' work, I just think if I had done it later in the year after they'd worked more on developing ideas, the work could have been even better.