Showing posts with label recycling. Show all posts

Monday, April 27, 2015

2015 Bottle Cap Murals

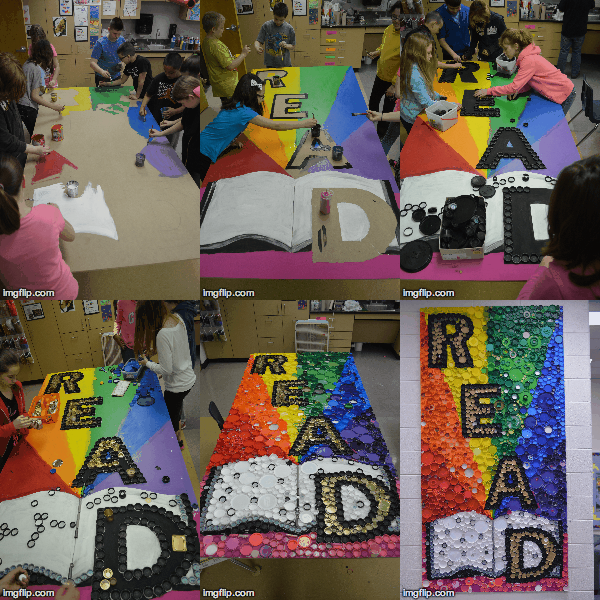
2012 was the first year my Intermediate school created bottle cap "murals". Some were small, some were medium, but this year we went BIG to make two 4x8 foot bottle cap murals that were recently installed on walls in our school. Previously, we'd reused cardboard sheets or other materials donated to us for backing and hot glue. This year, I received a grant from our district's foundation and used that to purchase 2 sheets of MDF and 2 cases of DAP Alex Plus caulking to use as glue. (We had one case leftover)
I'm not sure between the caulking and hot glue which one sticks better. I thought the caulking was working fine, but several caps have had to be re-glued. I had used a caulking gun to squirt it out on cardboard and the students dipped the caps and stuck them down. I think some students just didn't get enough caulking on the back, while others got WAAAAAY too much. The maintenance crew that hung the panels suggested Spikes Special Adhesive and left me a small tube for repairs. It does seem to be sticking really well and is definitely stronger than the caulking. However, I don't know how the cost would compare. I suppose it's another option for someone to look into.
Overall, I was pleased with how things came together. In previous years, I've let the students totally design the panels. This year since I knew they would be permanent, I gave students the option of submitting plans and I had things sketched out before they came. The outer space panel was based on a student's sketch and I designed the READ mural for the library.
Students working on painting and applying caps to the space mural.
The READ mural is my favorite! I have a few caps to replace since some fell off during installation, but it already looks awesome and is a nice feature in the library.
 The space mural turned out pretty good, but has weird gaps. Students said we were out of black caps (found out later they just didn't look carefully enough) so we spaced the caps out. Now there are gaps just a tiny bit too small for me to fill them in. I hung up signs on either side reminding students not to touch but it's a high traffic area so I'm sure it will happen. One of the custodians is talking about using some small screws to secure more caps.

Saturday, April 25, 2015

Recycled Art Challenge

In honor of Earth Day, my 2nd and 3rd grade students participated in a "Recycled Art Challenge". We started by looking at this self-portrait gif on Tom Deininger's website and talking about why an artist would choose to make art out of trash. Next, we scrolled through some examples I'd collected on my Recycled Art Pinterest board. I had a buffet of materials from which they could choose- cardboard, toilet paper tubes, tissue paper I saved from gifts, bottle caps, and a variety of other items- and after explaining how the supplies were set up and that they'd have two class periods, the students set to work.
 The students worked REALLY hard on this project. I didn't see a single student slacking. There was a lot of collaboration, a lot of advice-giving, problem solving, creativity, and excitement. Several students finished and immediately asked if they could make another recycled project.
 This student wanted to make a park with trash to try to get people to pick up litter and recycle. She even used a glue stick cap as a trashcan and tied up trash inside a teeny tiny little bag.

 I used a hot glue gun to attach some things when students were having a hard time keeping it steady long enough to dry.
I loved this simple dog! The burlap scraps someone donated were very popular. The eyes are made out of watercolor wells.
This student also used watercolor wells to make the eyes and mouth. Instead of gluing them to the flat surface, he cut holes in the cardboard and poked them through.

I think this challenge will be repeated next year at my new school!
I posted this lesson in a bit more detail on the smARTteacher- check it out!

Saturday, August 9, 2014

Eco Art


Last April the Art Walk in my hometown fell the same week as Earth Day. One of our Art Walk people decided to put out a call for Eco Art- Art made by recycling or repurposing. I love having an "assignment" and got a few ideas in my head right away.
The first two ideas were ducks! I have an interest in ducks as you may have noticed if you've been hanging around this old blog very long. I decided to make a torn magazine paper collage of a mallard based off a photo I took over spring break. It went pretty smoothly. I sketched the basic outline and proceeded to find colors to tear, arrange, and glue to the paper. I enjoyed trying out that style of collage. The mallard collage was donated for a fundraiser to help with future art walks. 
For my next duck, I focused on a drake wood duck coming out of the water. I started off using the same approach as the mallard- I sketched, I tore, I glued. I tried painting the background of my cardboard panel. It wasn't good. It was too flat. I had to make the hard decision and come up with a new plan. I like the look of corrugated cardboard and figured since the theme was "eco" art, there was no reason to try to hide the material. I used an exacto knife to cut around the duck and then started to peel the top layer of paper off. After I had removed the top layer, I painted over the corrugation to get my finished piece. The hardest part of this project was actually finding magazine papers to match the colors close enough. Wood ducks have a LOT of different colors and those colors aren't always easy to find.
The last project I created for the eco art challenge was a simple gouache painting on a small cereal box covered with gouache. I used Elmer's Art Paste for the papier mache process. I used to go with liquid starch but after reading about how the art paste goes a long way and will last quite a while I decided to give it a try. I still have a whole bunch in a sealed gallon ice cream carton waiting for my next project. After I had covered a few boxes with newspaper, I let them dry and then gave them a coat of white paint. On this box I decided to paint a picture inspired by a barn that I see on my drive to school. Of course I always end up making my colors brighter than they are in real life. I hadn't used gouache since college but I think I'll pull out those little tubes more often. I love how quickly it dries! This little painting sold after the art walk.
I hope you enjoyed this little peak at some of my artwork. Recycling has become a priority to me since becoming a parent and doing it through art is a fun solution!

Thursday, July 10, 2014

Upcycled Character Magnets

I know art teachers are prone to saving things... but sometimes I think I'm one of the worst! Example: cardboard from cool packaging. My youngest turned one in June and received a World of Eric Carle Zoobies Very Hungry Caterpillar Book Buddy. It's a cool plush toy with a soft story book attached. It was in a box with that trademark Eric Carle painted paper style and had several little illustrations of the VH Caterpillar and the butterfly. I just couldn't throw it away yet, determined to find something to do with it. 
I grabbed my box knife and cut out squares and rectangles around my favorite illustrations. Then I remembered we had another Eric Carle box left from a board book set that had A House for Hermit Crab in it. A little more digging through my 3 year old's books led to the discovery of a Curious George box set. He'd had fun playing with the boxes but they were starting to get beat up. I came up with the very simple idea of adding button magnets to the back with a dot of hot glue.  
 Between the 3 1/2 year old and the 13 month old, the magnets have been a big hit. They're displayed on our oil drip pan magnet board. The boys like to rearrange them. And carry them off. I have visions of using them for storytelling in coming years. The thick cardboard from the packaging makes them pretty sturdy. Now I have a plan for any cool pictures I might come across on cardboard packaging in the future!

Monday, September 9, 2013

Crayola ColorCycle

Have you heard about Crayola's ColorCycle program? Someone told me about it last week and I just got both my schools signed up. Similar to the Elmer's Glue Crew program I described here, you just set up a collection bin at your school and when your box is full, the company will pay for shipping to collect the waste. From their website,

Crayola ColorCycle - Turn Crayola Markers Into Energy!

Crayola and schools across North America are banding together to help kids understand the importance of their role in protecting the environment. That’s why we are launching Crayola ColorCycle. Through this initiative, students in K-12 schools across the continental United States and parts of Canada can collect used markers and send them to a conversion facility where they will be transformed into clean-burning fuel.

How cool is that? The FAQ section states that they will accept other brands' markers, not just Crayola. They even accept dry erase markers and highlighters. Your school doesn't earn any money for this program, but it's still a great thing to do and a fun way to teach students about recycling. I've just got to make a cool box to hold the dried up markers now! Will you join me in recycling? I hope so!

Saturday, July 6, 2013

Recycling at School

In the last couple of years, recycling has really become a priority for me. We recycled at my house growing up, but then I got out of the habit when we weren't allowed to recycle in the dorms at college. My roommate and I had asked to recycle water bottles and our RA said they were afraid of attracting "critters" so we couldn't. Anyway, we've been recycling everything we can at home and I've been trying to get more recycling going at school. 

There are a couple of ways we've been working on recycling more at school, besides recycling materials for Art class (like our bottle cap artwork). 
  • Terracycle is one way we've been recycling. This company is super cool. Their goal is to eliminate the idea of waste. They have several "brigades" you can sign up for that allow you to ship hard to recycle materials to their location. It doesn't cost anything to participate. You collect the items and when you have enough to fill a box, you print off a label that lets them cover shipping the box to NJ. Recycling with Terracycle can even earn money for your school. Most brigades will earn 2 cents per elligible item. It's not a lot, but it's getting paid for trash! The first brigade I signed up for was Elmer's Glue Crew. We collect empty glue sticks and glue bottles that would otherwise be thrown away. I keep the drop box right by the Art room door. If we have empty glue containers in Art class, they go in the box. I also made sure that classroom teachers know about it and they'll drop off empties with their students. We are also signed up to collect diaper and wipes packaging, personal care/beauty items (everything from empty mascara tubes to hair gel bottles), oral/personal care items like deodorant tubes and old toothbrushes, and printer cartridges. Right now I have drop boxes by my door but it's not the best system. I'm hoping to get some bigger recycling bins next year that can be put in a more central location at school so that more students can participate.
  • Recycling bins in the teacher's lounge- We already had collection bins for paper and pop cans, but I was seeing a lot of other recyclables being thrown away. One of the 6th grade teachers brought in a stacking set of recycling bins that they didn't need at home anymore. As a staff, we've gotten a lot better at recycling since it's so accessible. We now have an easy way to recycle plastics 1-7 (they don't have to be sorted, how cool is that?), cardboard, tin cans, glass bottles, etc. For now only the plastics and paper can go in the recycling dumpster that gets picked up at school, but I just take the other items to one of the multi-stream collection dumpsters when they get full.
  • Student Recycling Club- We just started the recycling club (PS Green Team) after spring break.  I had over 40 students in 4th-6th grade show up! Our first order of business was to brainstorm ideas for the rest of the school year. It could really only be about 6 weeks because I ended up having check ups scheduled during the before school time slot. In that time, we made posters with lots of recycling facts, planned activities for "Earth Week" (why just celebrate Earth Day?), and had a Terracycle collection contest. Not all the events we planned for the whole school went over well, probably because I am only there 2 days a week to remind people. But, I figured it was a promising start and the students are excited to start up again next year.

During Earth Week, I had students in my room at recess to make some recycled presents for the birds in the courtyard. The first thing we did was make bird feeders out of toilet paper tubes. We spread peanut butter on the tubes, rolled them in bird seed, and slid them over branches on the trees outside. It was super simple and the birds loved it. It was really cool to see the birds right up next to the windows eating the seed and something we'll do again.
 I also cut big openings in some plastic milk jugs to use as larger bird feeders. We hung a couple outside. We couldn't just throw away the piece of milk jug that wasn't needed for the bird feeder, so we tried using it to distribute nesting materials. We used a simple hole punch to put holes around the edge, put a loop at the top for hanging, and stuck too-short-to-use leftover pieces of yarn from weaving projects through the holes. I think this design could work... we should have just put smaller holes or more yarn through each hole because the wind blew them away!


Friday, November 2, 2012

Torn Paper Snow People

Last year I saw a post on Art Makes Kids Smart about using "GOOSe paper"- Good On One Side in Art projects. I thought this was brilliant and a way to make reusing fun so students don't feel like they are using trash. I used the idea with 1st grade students to make torn paper snow people. I'm pretty sure this was a two class period project. The students used 9x6 inch colored construction paper for the background, tore GOOSe paper for the snowy ground, then used more GOOSe paper for the body of the snowperson and construction paper scraps for the accessories. We finished it off with crayon details. Glue sticks worked great and I really liked the personality in the students' work. 
I must have let the students use scissors to create the accessories but there was a no scissor rule for the first day with the snow.
  

Sunday, February 12, 2012

Another Jim Dine post


Source: artnet.com via Katie on Pinterest

I wanted to do a Jim Dine-inspired lesson with Kindergarten to help them get [even more] excited for Hoops for Heart and at first, I planned to do something similar to the lesson I tried out last year. The students noticed the texture in the background of some of Dine's heart paintings, "scribbled" with cool colors on cool colored paper, learned to make a symmetrical heart by cutting folded paper, then used the cut out as a stencil to brush a red heart over the background.
Last year's Dine project
Then I saw a post from Rust and Sunshine about making heart stamps out of cardboard tubes, and since I knew the students would have so much fun with it, I tweaked my plan.  http://rustsunshine.blogspot.com/2012/01/heart-stamps.html

This was completed in one, 40-minute class period. First we looked at and discussed Dine's painting shown at the top of this post. I asked the students to just look and think for a minute, without saying anything before talking. Then I asked "What do you see?" and the students raised their hands to name things. The first thing mentioned was, of course, "hearts". I was trying to get them to say the word "shape" when I asked "what are hearts?" and "what do hearts have in common with circles, squares, ellipses, triangles, and rectangles?" I finally gave up after I got answers of "square!" and "circle!" and told them that they are all shapes! We took a minute to discuss if the hearts on the projector screen look like the real hearts in our bodies (the students were split on this but I convinced them they are a little different) and what we can do to have healthy hearts.

Then the students pointed out the different colors and we talked about how some of the sections looks like they have texture. After demonstrating some crayon techniques to achieve different textures, the students used crayons to fill in their 8x10 inch paper with colors and textures. When they were done with the background, I showed them how to use the cardboard tubes turned heart stamps by gently pressing them into the paint and then stamping on their paper. I made about 30 stamps and that was enough to get through my 6 Kindergarten classes. Some stamps were in pretty bad shape by the end from students banging them onto their papers, but the other end of the stamp was usually usable.

*If you make cardboard heart stamps, definitely use a good piece of tape to make the folded tubes hold their shape, like is suggested at Rust and Sunshine where the idea came from.


Thursday, June 23, 2011

Giant Box Turned Frame


One of the custodians asked me if I wanted some giant boxes last fall.  I didn't know what I was going to do with them, I just knew they were giant and had potential!  I decided to turn one into a big frame that I can have my younger students use to act out paintings from Art History.  I finally had time to cut the opening and paint the box at the end of the school year.  I didn't use a yard stick or worry about making anything perfectly symmetrical, I like it a little off balance.  I drew the frame with a marker first then painted it with tempera paint.  I cut off the flaps from the open side so the students can either walk in the side or step through the hole.  I'm sure this could also be used as a puppet theater.

One of my students helping test out the box.  


I still have some not-quite-as-big boxes and I'm trying to think of the best use for them.