Showing posts with label symmetry. Show all posts

Wednesday, November 26, 2014

1st Grade Indian Kite Festival

My 1st graders learned about the history of kite flying in India for their Cultural Heritage project. We watched the first part of a video about a Kite Festival in India that shows the transition from day to night.
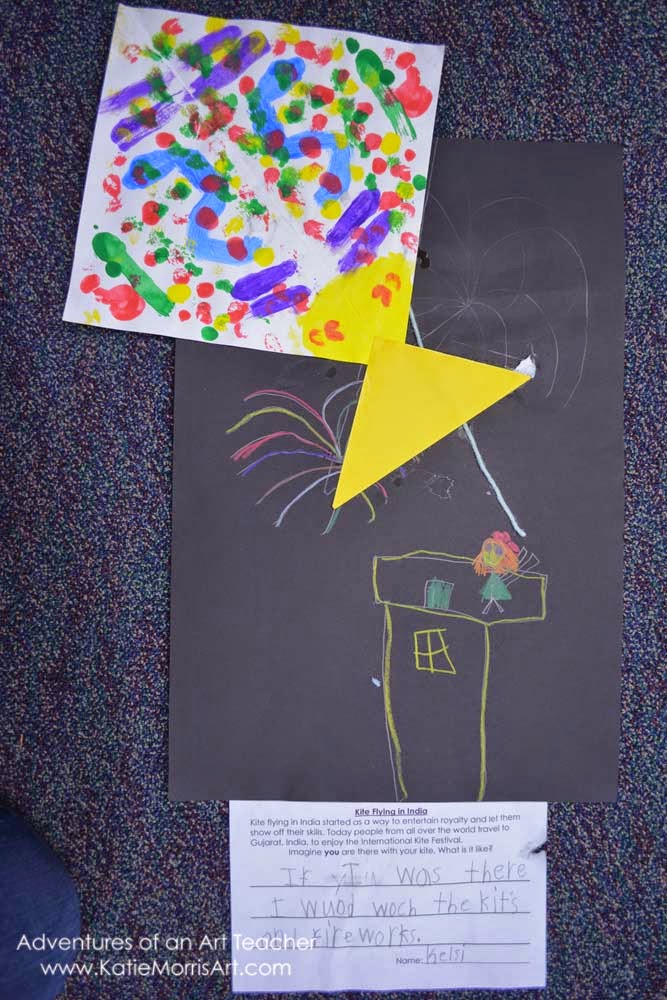
We talked about what we saw in the video and then looked at some photos of kites. The students made symmetrical kites with liquid tempera. First, they folded the 9 inch (I think) square paper with a taco fold so that it would be oriented on the diagonal. Next, I showed the students how to paint a little section on one half of their kites, fold, and press, then repeat until they were satisfied with their designs. Originally, I was going to just have them make kites but then they wanted to add string, and then I started thinking about how to get them to imagine the experience more. 
In the next class, students created a drawing on either black or light blue 12x18 inch paper of the kite festival at either day or night. In the video, we saw many people on rooftops to fly kites so that is where most students drew themselves. After the drawing was complete, the students glued their kites and connected yarn from the kite to their drawn hands. 
 Nighttime was the most popular choice because there were lots of fireworks! A few students did choose daytime. I also very briefly talked about perspective and how the kites look closer to the viewer since they are bigger than the drawn people.
 Students wrote sentences about their imaginary experience at the kite festival. Click the picture for a larger view if you want to decipher cute beginning of the school year 1st grade sentences. :)

Friday, July 19, 2013

Kinder Symmetry

My Kindergarten students had fun squishing paint around between a folded piece of paper to see how the colors could mix and how it makes a symmetrical design. Since the elementary art SMART goal this year had to do with Kindergarten students learning about primary and color mixing, each student showed me where they wanted a squirt of each primary color before they squished it around. When the paint was dry in the second class period, the students chose from a variety of materials to finish their artwork.
I told them they could turn their symmetrical blob into whatever they wanted and it could even just stay a design. The students especially loved using scrap construction paper to add to their artwork. My kinders are fascinated by forming tubes with paper to attach to their art. I also had a couple students ask to turn their paintings into masks and even a belt, so I helped them figure out how to poke a hole and tie yarn. I didn't get any good pictures of the wearable art, but they were kinda cool!
Students working on their symmetrical pieces and adding text.

Wednesday, May 22, 2013

Show me the Symmetry!

Before Greg Percy visited, I made a point to use one of his songs with each grade level. 4th graders listened to the song about symmetry (I think it's called "I'm Beside Myself" but I don't have the CD with me to check.) The songs covers two kinds of symmetry- bilateral and rotational. The 4th graders were excited to tell me that they had just been reviewing symmetry in math class so I guess the timing was good! After the song and a PowerPoint I made with images for both kinds of symmetry, the students' assignment was to "show me the symmetry!" They could make anything they wanted as long as it somehow showed a type of symmetry. The overall composition could have been symmetrical or the object the drew could have been symmetrical.
We all know that student combinations can lead to classes with very different personalities... three out of my five 4th grade classes were excited, got ideas right away and jumped right into their projects. I encouraged them to play with some geometric shape tiles I inherited if they were stuck on coming up with an idea. Two classes needed a little more guidance to get started. I showed them how they could fold a paper in half, draw a shape on one side starting from the fold, cut, and open to have a symmetrical shape to turn into something. I showed the same concept but with their name forming the shape and that was a popular option. 
 Some students stuck to formal compositions made entirely out of geometric shapes while others figured out how to represent something that's important to them... like Dr.Who!

Saturday, March 3, 2012

3rd Grade Sunflower Mandalas


Kansas Day is a big deal in our elementary schools. (I assume that other states also make a big deal out of their birthdays if they fall in the school year...) Each grade K-3 worked on a Kansas inspired Art lesson during January. My 3rd graders made sunflower mandalas in 3 class periods. 

Day 1: Quick introduction to mandalas- I showed some of the mandalas I collected on my Pinterest board and the students tried to figure out what they all had in common. After they figured out that they were all based on circles, I covered some history, symbolism, and introduced radial symmetry. I told the students about the little Mandala class I took last November through Willowing and showed some of my work from it. Then I demonstrated and the students spent the rest of the first class drawing their mandalas. I created 4 simple templates (and printed on copy paper) for the students to choose from as a starting point. They learned to alter and personalize their mandalas using a ruler and a drawing compass. Getting the hang of the compass was tricky for some students, but they practiced on the back of their paper first and all got at least a little success with it. At this point, the students didn't know the mandalas would be part of a sunflower. I didn't want them to get confused and start drawing a flower.
One of my mandalas

 Day 2: I projected a really close up image of a sunflower head. The students could see the pattern created by the distribution of the seeds and compared it to patterns and symmetry found in mandalas. We also went over some sunflower facts- how tall they can grown, they can be annuals or perennials, they follow the sun, anatomy, etc. Then we reviewed warm and cool colors and the students used warm and neutral colored pencils to color their mandalas. When they were finished, the mandalas were cut out and glued onto heavier paper.


Day 3: After gluing the mandalas to the new piece of paper, the students drew petals and other necessary parts of a sunflower. Some added leaves, some didn't have room and that's OK. My Monday classes only had 2 days to work instead of 3 so they drew the petals onto the copy paper to save time. If you could print the template on card stock, the cutting and gluing would be unnecessary. They finished coloring with colored pencils and color sticks. The last 10 minutes of the last class were reserved for writing about their artwork. I tried an Artist Statement form thinking it might help, but I'm not convinced it did. They thought it was more of a fill in the blank thing than a write complete sentences thing.
 I wasn't sure how this would work out- teaching 3rd graders to use a compass. They did really, really well with the tool. Once they got used to it, the only thing that was confusing was choosing natural points on the mandala, like at the intersection of lines or shapes, to add their lines and shapes instead of having them float around randomly. Some started off thinking it was too hard but were really proud when they finished. I don't know if this lesson could go any younger, but I think even older students would enjoy it. The Fibonacci sequence could be used for a math connection.


This student turned the circles into bees.