Showing posts with label Alexander Calder. Show all posts

Tuesday, December 17, 2019

4th Grade Calder Inspired Circus Sculptures- 2nd batch!


This year my elementary school chose a circus theme and I started the school year off with circus themed projects to ease into things. I have most of my elementary classes for a whole semester but 4th graders switched for 2nd quarter. I decided since the first group enjoyed the process so much, I would repeat it with the 2nd group, and I'm SO glad I did. The kids blew it out of the water! They were so engaged and wanted to keep collaborating and adding cool features that it ended up taking the bulk of their art classes. Having class on Friday left them short 2 classes due to Thanksgiving break and Christmas break starting this Friday, but I'd rather have them do a really good job on a couple projects than be rushed through more.
We started pretty much the same way- talking about Alexander Calder's work and watching part of one of his circus performances- I didn't have time to read the book "Sandy's Circus" to the students this time but it is a great book that they enjoyed! I borrowed it from my local library but you can find a read aloud video online or order from Amazon.
If you order from my link I may recieve a small commission at no extra cost to you.

After the video, I showed students the tubs of objects available for them to use. We had pipe cleaners for wire, fabric scraps, yarn, beads, buttons, gems, cardboard, and all the scraps found in the collage center and recycling bin.

This was a collaboration between 2 girls- there is a horse rider in the front and trapeze artist hanging in the back.
One of the students made Dumbo complete a feather!
Bird Man
 
This is the group that discovered the recycling bin
When one group discovered the recycling bin, they maybe went a little overboard. In the next class we talked about transforming objects so that people could understand the new purpose. This group created a tank with someone holding their breath, turned a plastic cup into a stand for the spotlight and operator, made a packing material into a nest for Bird Man, and used a pop can as his perch.

Details of the circus performers
This group became very adept at creating little performers. They would get everything formed and just ask me to hit it with hot glue. I felt more comfortable being the hot glue gun operator. I stationed myself where I could supervise everyone and they just brought pieces to me to glue.

If you have a lot of random "craft" items or found objects taking up cabinet space, this project would be a great way to use some up in a creative way. If you ever want to do wire sculptures with your younger students but don't have the materials to do it safely, pipe cleaners can be an easy substitute!

Wednesday, October 30, 2019

4th grade Calder Inspired Circus Sculptures

Each year my elementary school starts the year with a theme and this year the theme is circus! I like to use that theme as a starting point for each grade's first art classes of the year. This year my 4th graders looked at Alexander Calder's circus and then had choice of a whole bunch of materials to use for their own circus sculptures.

To begin the lesson, I read the book "Sandy's Circus" to the students. I borrowed it from my local library, but here's the Amazon link if you'd like to buy it. 
(If you purchase with my link I may get a small commission at no extra cost to you.)

After reading the book, I showed the students part of the following video where Alexander Calder performs his circus!
I pulled out a tub of pipe cleaners to serve as our wires. In my cabinet I also found buttons, feathers, sequins, beads, other "crafty" materials that were donated, and found objects. I put the tubs out on the table and the students were able to take what they needed buffet style. 
I cut pieces of cardboard down for bases and showed how to attach things by poking holes, making slots, using buttons, etc. Of course students invented their own methods and some things required glue.
Feathers make for very fluffy lions.
While some of the sculptures are more abstract than others, I saw a lot of problem solving and experimentation, which I think is more important than perfectly polished artworks.
Here is the display. There is even someone on a flying trapeze hanging from a support!

Thursday, July 14, 2011

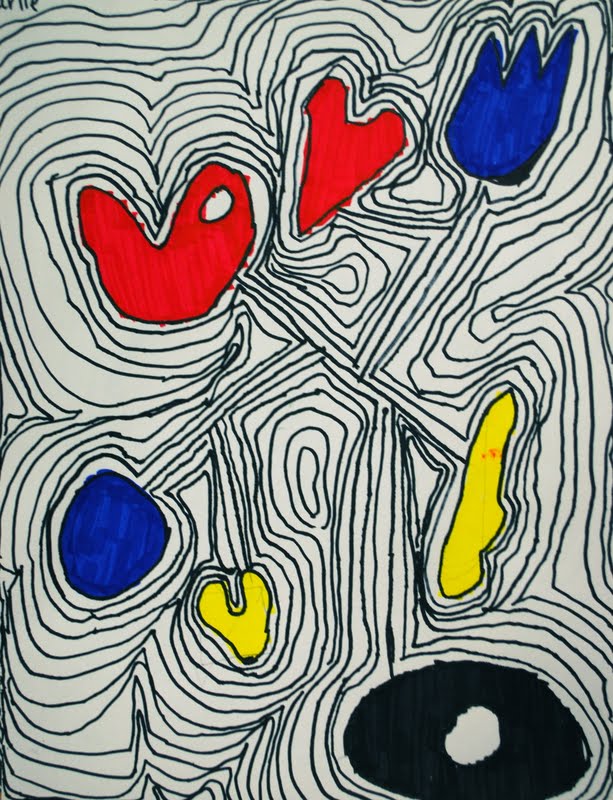
1st Grade Mobile Marker Drawings


I used Calder.org to introduce my first grade students to Alexander Calder's artwork, focusing on his mobiles.  The website is so comprehensive that I just used it instead of making a PowerPoint.  We mainly focused on the shapes he used during our discussion.  I drew examples of different shapes he used on the chalkboard for reference.  For the studio portion, I first asked students to draw 5-7 shapes that look like the kind of shapes Calder would have used.  (I try to teach the students the difference between being inspired by something and copying something.)  We talked aboout negative space and I asked them to put a "hole" in one of their shapes.  After the shapes were drawn, I showed them how to connect the shapes with lines.  *I recommended that they not form a ring by connecting the shapes in a circle.  I checked the drawings at that point to make sure there were no floating shapes and that they had drawn big enough.  When they were ready, I gave each student a sharpie to trace over their pencil lines.


Last year at this point in the project, the students painted with primary colored tempera paint.  This year we still reviewed primary colors but we tried out our brand new Mr.Sketch markers! (One thing I'm glad I ordered.)  I showed the students how the markers have a square tip and you can make wide strokes like you are painting a wall for the big part of the shape and just use the pointy tip for really skinny areas.  I'm thinking this will make the markers last longer since it reminded the students not to layer and layer and layer the ink.  I was very impressed with the quality of the markers.  Anywho...


After the shapes were filled in, I showed the students how to trace around the larger shape created by the smaller shapes.  We compared  it to ripples or concentric circles.  The students kept "echoing"the shape, leaving a small gap, until all the space was filled in.  They worked from the middle > out, then outside > in to fill in for any closed off spaces.  I think the lines made much more interesting visuals this year and the students were so proud when they finished!  This was actually a very calming process so that was a bonus!

Monday, March 8, 2010

Calder-Inspired Paintings


So I must be on a primary color kick.  I wanted a simple painting project to do with my 1st grade students to cover fundamentals.  I decided to show the students Alexander Calder's mobiles, discuss the lines, shapes, and positive/negative space, and reinforce primary colors.  This project took two 40-minute class periods.  Day 1 was discussion and drawing, day 2 was painting.

Art of Petals (Mobile) 1941

I started by asking the students if anybody knew what a mobile is.  (Several thought I meant mobile homes.)  I referenced crib mobiles as something the students were familiar with and told them that Alexander Calder invented the mobile.  I explained that "mobiles" move and "stabiles" do not.  Then we talked about the artwork in terms of the elements of art.  I love all the different shapes Calder used.  We described the shapes and I drew them on the board for the students to reference when they started their artwork.  

I modeled the process as I gave the steps for the project.  I asked the students to draw 5-7 shapes on their papers with pencil.  (We added a couple circles to be negative space inside the shapes.)  After the shapes were drawn, I showed the students how to draw a few lines connecting the shapes.  It is important to tell the students not to draw the lines in a way that makes a ring.  If students connect EVERYTHING, they will get confused when painting.  (See below!)  After drawing everything in pencil, the students traced their lines with a black sharpie.  I know that a lot of people use sharpie at the end to cover up getting outside the lines but some students erased so many times, I don't think they could have figured out which lines counted without the outline!  I told the students that the projects were abstract so it was ok to just have lines and shapes.  Some students decided to draw a line to the top of their paper to make it look like the shapes were really hanging in a mobile.

One of the many students who accidentally painted the negative space.  If you make a mistake, make it great!

Next, I used my Mr.Brush poster (wanted to use the Young Sloppy Brush video but I can't find it ANYWHERE!) to go over paint brush care with the students.  I hate to admit that this was the first real painting project I had taught my 1st grade students.  I tried a printing/painting project last fall and was slightly traumatized by it- Check out my worst idea ever!  I read on another blog, can't remember which, that teaching 1st grade students is like trying to hold down a bathtub full of corks and I totally agree.  But I digress...


I have about 5 students at each table.  I put out 2 water cups and one paint palette loaded with red, yellow, and blue tempera paint at each table.  I told the students we were going for at least one shape of each color (pure primary, not mixed) with white negative space.  I think that the most important skill the students gained was cleaning their brushes before switching to another color.  I told students that before switching, they had to clean their brush in the water and wipe it on the paper towel to make sure it was clean.  There seemed to be one or two kiddos in every class that just could NOT get the hang of it!  They would either drip colored water into a different paint well from not wiping their brush or would dip in one color and go straight to another.  I had intended to just cover the palettes and refill for the next classes but I was lucky to make it through one day- two back to back classes- without having to put out "clean" paint.  Oh well, it really didn't use very much of my supply since we kept the background plain white paper.


Check out the whole exhibit in our Artsonia gallery!